

DIY Halloween Skeleton Fountain-Video
DIY Halloween Skeleton Fountain
Isn’t he just the coolest prop to add to a Halloween haunt??!!! This guy has been in my haunts for a long time…probably going on 20 years now. My brother Jeremy was actually the one who thought this prop up all those years ago and of course I got the privilege to watch as he built it. This past year I gave Mr. Skeleton a makeover…the bucket that the he was holding was kind of a cheap, flimsy one and had cracked from lots of use over the years. SO, I pulled up my sleeves and gave this guy a new and improved water basin to hold. In doing so, I figured I’d write a post on how he’s put together so that you can make one too! (since he’s just so awesome!)

DIY Halloween Skeleton Fountain-Tutorial
A thought on what type of skeletons to use:
Nowadays there are all kinds of plastic posable skeletons out there to choose from.
Bucky skeletons last literally FOREVER. Mine is still going strong after 20 years of enduring the excessive AZ heat, being stored outside in a shed during the off season (not to mention surviving a fall one year when a big gust of wind came along and blew the whole fountain down face forward). When I put time and energy into a prop, I like it to last for a long time, but Bucky Skeletons can be a bit pricey, unless you can find a used on somewhere.
If you’re on a tight budget, you can always opt for one of the cheaper ones. They’re just as realistic-looking as a Bucky but they just aren’t as sturdy, and they may not last quite as long (only time will tell). If you decide to go this route, you can purchase a really good one HERE
Tools:
- Chop saw
- Skill saw or table saw
- Power drill with bits
- 2 paintbrushes
- Heat Gun (for corpsing skeleton)
Supplies:
Wood Frame Backdrop
- One sheet of 4×7 plywood at 1/4″ thickness
- One 2×3 at 2ft 7in long
- Two 2x3s at 8ft long
- Three 2x3s at 3ft 7in in length
- 1 or 2 cans of spray foam insulation
- Box 3in wood screws
- Box of 1 1/2in wood or drywall screws
- 1 can brown spray paint
- 1 can black spray paint
Skeleton Corpse
- One Bucky Skeleton torso (you can buy one with free shipping HERE)
- One water pump
- Tubing that fits water pump at 3ft in length (for pumping water from bottom of bucket to mouth of skeleton)
- 1pint-1/2gal of Liquid latex (for corpsing skeleton)
- Plastic drop cloth at .7mm thickness (for corpsing skeleton)
- Cheap brown wood stain (to paint skeleton corpse)
- Large bucket or container for the water basin that skeleton holds (I bought a sturdy wine barrel plastic look-alike that was somewhat flexible, so that I could press one side flat against the board to screw it in)
- One 1/4in diameter bolt with nut at 3-5in long (for hanging skeleton) I used a 3in long bolt but my Bucky is older and has a long rod sticking out of his skull which enabled the head of the bolt to sit closer to the board. The newer ones don’t have the rod so you will need a longer bolt (5-7in long) to mount
- One washer to fit bolt (for hanging skeleton)
- 6 washers to fit 1 1/4 wood screws (for mounting water basin)
Screw together the two outer 2x3s and the 3 horizontal ones with the 3in screws. Then screw the plywood to the frame with the 1 1/2in screws

Screw on the smaller vertical 2×3 brace

Cut your Bucky in half at his lower spine, you’ll only be using the torso part (save his lower half for another project!)

Older Bucky skeletons (like mine) used to have a long rod with a hook at the end. My bucky was mounted onto the backdrop board with a bolt that passed through the metal hook on the top of his head.
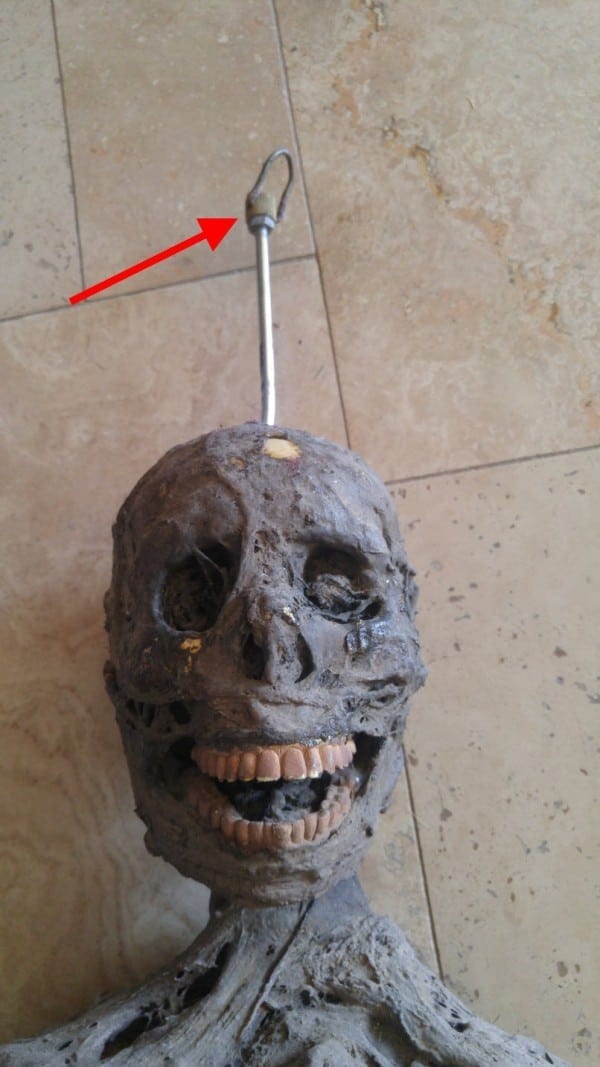
Newer buckies only have the hook coming out of the top of their head (minus the rod). In this case you’ll need a longer bolt to mount your bucky, since the head of the bolt will sit further away from the board when mounted

The vertical brace on the back of your board will be holding the weight of your bucky

Drill a hole large enough for the bolt that will be mounting your Bucky with, to pass through (See yellow dot)

Line up the hook with the hole you just drilled. Slide the bolt through the hook, then through the 2×3 to the back of the board. Make sure you slide the washer onto the head of the bolt before sliding it through the hook (The washer will keep the bolt from sliding through the hook)

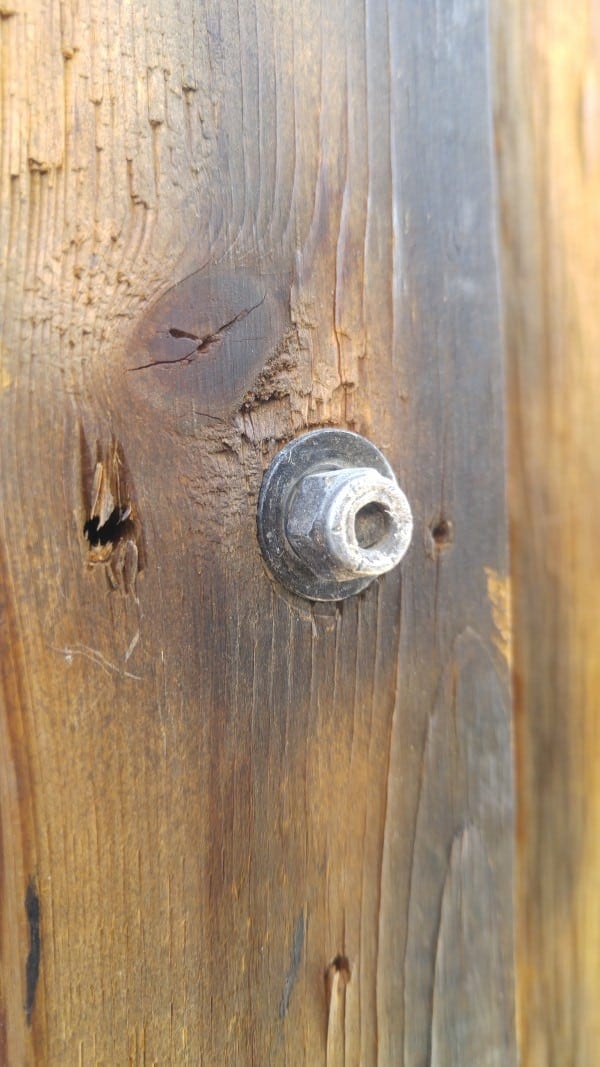
On the brace on the backside, secure the bolt with a nut and another washer
Take off the springs that hold the jaw in place…this will enable the mouth to stay open for the water to pour out of

Screw bottom jaw onto skull by first drilling a pilot hole, then drill in a screw. This will leave the bottom jaw fused open

Now comes the fun part, as you need to ‘corpse’ your bucky! Corpsing gives your skeleton a very realistic look and it will make your fountain look awesome if there’s a little ‘flesh’ for the water to run down along his ribcage. My skeleton was corpsed using the older version (cotton batting and latex), which looks great but it took forever. Now I prefer the newer, faster version…using a large plastic drop cloth and a heat gun.
Since I don’t have any footage of myself corpsing a bucky, I found a really good video on how to corpse one using the plastic drop cloth and heat gun method…
After you’re done, you can go a step further (if you want) and darken and highlight his features with some paint (such as his eye sockets and the openings of his nose)

You can do this around his rib area too if you like.

As you can see, cobwebs were also added as a final touch 😉

It’s time to mount the water basin!

The horizontal brace on the back of the board will be supporting the weight of the water basin when you screw it in from the front…

I screwed on the basin with 4 wood screws & washers (See yellow dots). The basin will only be filled with water just enough to cover the pump, so it won’t be very heavy.

I screwed the hands onto the side of the basin with my wood screws (remember, the basin will only be filled with water at the very bottom so it doesn’t’ matter if there are holes higher up

Now spray expanding foam EVERYWHERE, covering the back board. This will give the look as if the corpse is stuck ‘into’ the wall (this pic shows the old foam as well as the new foam I added after I replaced the water basin)


To protect the back of the board from getting wet, you can spray foam behind your corpse

Let foam dry and then spray paint with brown and black

Gather your pump and pump tubing…

Set up the pump and drill a hole into the board, large enough for the pump power cord to pass through.


Run the tubing up behind the corpse and insert the end through the back of his mouth (I spray painted the tubing with black paint to hide it)


Almost done! Fill basin with water (but only fill the very bottom, enough to cover the pump so the basin won’t be too heavy)

Plug in the pump and watch him go!

Lois Brittsan
Awsome! I Love these tutorials. Keep em coming. You’re my kind of thinker.
Tee
Aww…I’m glad you enjoyed the post Lois!
Larry Hall
Have you tried red food coloring in the water? Would that ruin anything? or a water proof red or blue light in the bottom of the bucket? Just wondering. I love this guy and just wondered if you’ve tried stuff like that yet.
Tee
Hi Larry!
YES!! I’ve done the red food coloring for the first year or two that I had him, then found that if I shine a red light downwards on him it also looks red. Both ideas work just as well!