
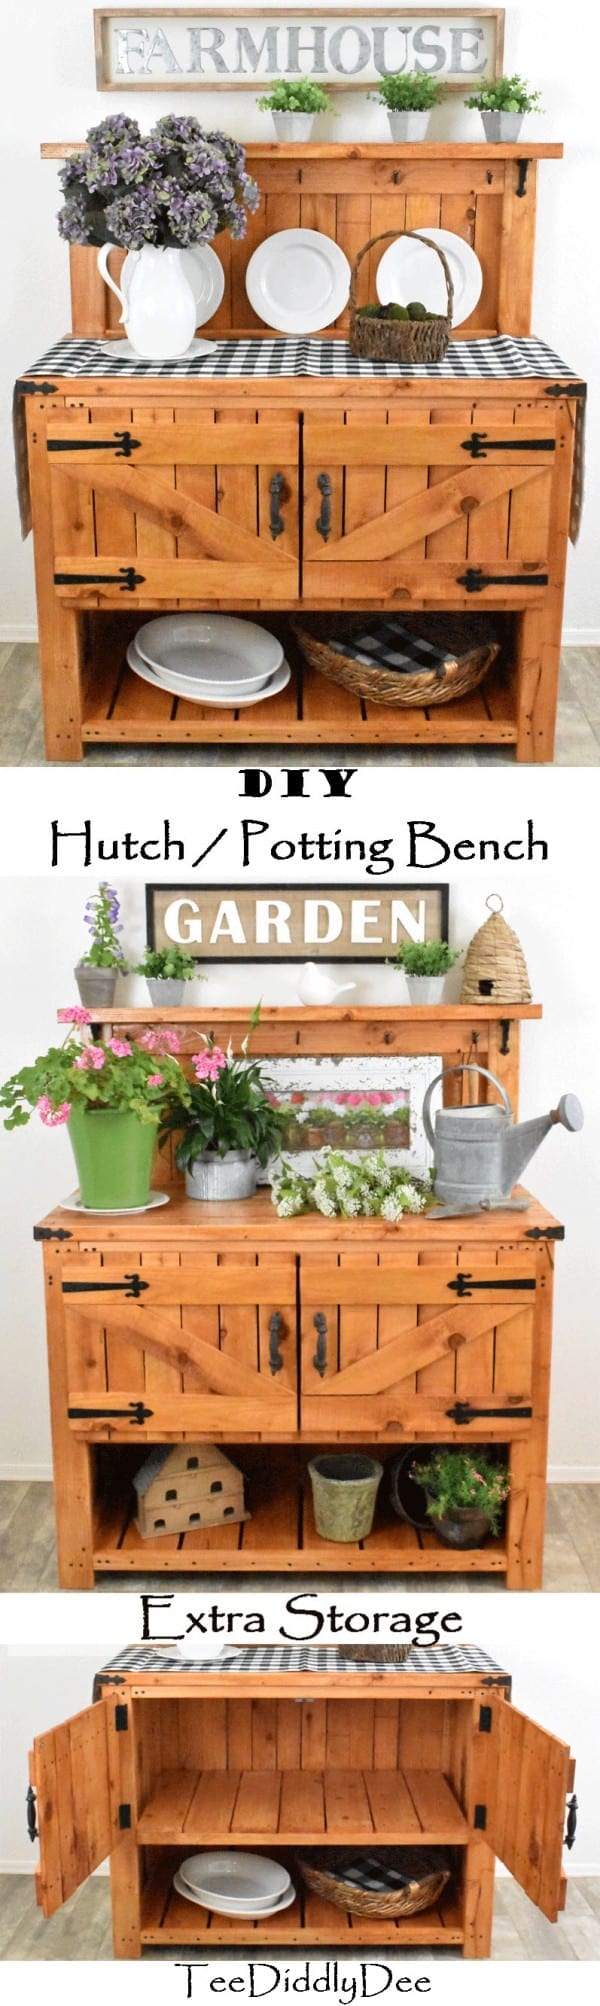
DIY Farmhouse Hutch / Potting Bench


I’ve gotten so many compliments on this little beauty! Best of all, this sweet hutch is very easy for the novice builder to make if you follow my simplified tutorial.

One feature it has is a plate stand to show off your pretty plates!
I also love the little shelf on top! It is perfect for your plants and other lovelies!

I have used black hardware to give this piece a more rustic, farmhouse feel.

Here it is decorated as a potting bench. Isn’t it adorable?

Did I mention the awesome storage it has! One area is hidden behind doors and the bottom area is open!
This quaint little potting bench looks great with all my plants and garden accessories!

Oh, and for you cat lovers! Did you know that this hutch can be made into a Kitty Box Hideaway!! No one would ever guess that you have a hidden litter box inside!
It is so convenient and handy for cleaning and is discretely hidden!
The pull out shelf is the most awesome feature on this piece that helps make cleaning the litter box really easy!
For the full tutorial on my DIY Kitty Box Hideaway, click HERE.
If you would like to make this adorable buffet / potting bench (without the hidden kitty box), keep scrolling down!

You will love this!
DIY Farmhouse Hutch / Potting Bench – Tutorial
Supplies:
Lumber:
- Two 2×4s at 34-1/2 inches in length (front legs)
- Two 2×4s at 53-1/2 inches in length (back legs)
- Five 2×2s at 40 inches in length (shelf braces)
- One 2×4 at 40 inches in length (top-back tabletop brace)
- One 2×4 at 47 inches in length (top-back shelf brace) I recommend waiting to cut this board so it can be cut to fit when you get to this point in the build.
- Six 2×4s at 48 inches in length (tabletop).
- One 2×6 at 50 inches in length (top shelf).
- Ten 2×6s at 19 inches in length (slats).
- Ten 1×4s at 29-1/2 inches in length (side walls). I recommend cutting these boards to fit when you get to this point in the build
- Four 1×2s at 19 inches in length (bottom-side wall braces).
- Twelve 1×4s at 51-1/2 inches in length (back slats). I used fence panels as they were cheaper
- Two 2×2s at 34-3/4 inches in length (the ‘x’ on the side walls). I recommend cutting these boards to fit when you get to this point in the build
- Two 2×2s at 18-1/2 inches in length (the ‘x’ on the side walls). I recommend cutting these boards to fit when you get to this point in the build)
- Two 2×2s at 15-3/4 inches in length (the ‘x’ on the side walls). I recommend cutting these boards to fit when you get to this point in the build)
- Twelve 1×4s at 18 inches in length (door slats). I used fence panels as they were cheaper
- Four 1×4s at 21-1/4 inches in length (door braces). I used fence panels as they were cheaper
- Two 1×4s at 21-1/4 inches in length (diagonal door braces). I used fence panels as they were cheaper. Also, I recommend cutting these boards to fit when you get to this point in the build
- Seven 1×6s at 22 inches in length (middle shelf slats)
Hardware:
- Box of 2-1/2 inch screws (I prefer using black-colored drywall screws as they tend to look more aged than the shiny golden screws do).
- 1-1/4 inch screws (I prefer using black-colored drywall screws as they tend to look more aged than the shiny golden screws do).
- 1 inch screws (I prefer using black-colored drywall screws as they tend to look more aged than the shiny golden screws do).
- Four 8 inch decorative metal straps (I found mine at Home Depot)
- Two metal corner brackets (I found mine at Hobby Lobby HERE)
- Two 3-1/2 inch metal shelf brackets (I found mine at Hobby Lobby HERE)
- Two metal decorative handles (I found mine at Hobby Lobby HERE)
- One double magnetic catch (I found mine at Home Depot HERE)
- Five small decorative hooks (I found mine at Hobby Lobby)
- Four hinges (I found mine at Home Depot) Mine were silver when I bought them so I spray painted them black
Miscellaneous:
- One coat of Stain/Polyurethane (I bought mine at Home Depot) The pecan had a little more orange in it than I expected so be sure to do a test spot before applying)
- One coat of Indoor/Outdoor Spar Urethane (I bought mine at Home Depot)
Tools:
- Miter saw
- Hand drill with bits (you’ll need a Philips bit, and few drilling bits for pilot holes and countersinking your screws. (I always use two hand drills so I don’t have to keep switching the bits out)
- Carpenter’s square (You can also use a ruler as I only used this for drawing straight lines
- Rotary Sander with 60 grit sand paper
Lumber – Pictures
Note: Numbers below correspond to numbers above under heading “Lumber”

#1-8
#9

#10
#11

#12

#13

#14
#15-16
#17

#18
Hardware – Pictures
Note: Numbers below correspond to same numbers above under heading “Hardware”

#1
#2

#3
#4

#5
#6

#7

#8
#9

#10
Miscellaneous – Pictures
Note: Numbers below correspond to same numbers under heading “Miscellaneous”

#1

#2
Tools – Pictures
Note: The numbers below correspond to the same numbers under heading “Tools”

#1

#2
#3

#4
DIY Farmhouse Hutch / Potting Bench – Instructions
Wooden Frame:
First, with the 2 1/2 inch screws (#1 in hardware), screw together the front legs, back legs and 4 slats (#’s 1, 2, & 8 in lumber). Remember to drill pilot holes to prevent cracking the wood!

Next, screw on the bottom two slats (#8 in lumber) 2 inches from the bottom of the legs (#’s 1 & 2 in lumber).

Now, screw on three shelf braces (#3 in lumber).

Finally, screw on the top-back tabletop brace (#4 in lumber) and also 8 slats (#8 in lumber).
Next, measure the exact distance between the back legs and cut out your top-back shelf brace (#5 in lumber) to this measurement.

Now, screw on your top-back shelf brace (#5 in lumber).

To screw it on, I drilled my 2-1/2 inch screws (#1 in hardware) at a diagonal and countersunk the heads of the screws. Also, drilling pilot holes first makes this so much easier!


X-Side Walls:
Now, let’s make the two ‘x’s that are on the side walls.

To cut out the longer piece of the ‘x’ (#12 in lumber), have someone hold the 2×2 against the side as shown (I didn’t have help so I sandwiched the 2×2 against the wall instead).

Next, using a pencil, draw 2 straight lines to mark where the 2×2 will be cut.

Using the miter saw (#1 in tools), cut the 2×2 along the lines you just drew. Now, make a second one by repeating the process on the other side where the second ‘x’ will be.

Next, screw them on as shown in the picture. Remember those pilot holes!
Now lets make the other pieces of the ‘X’ (#’s 13 & 14 in lumber) by having someone hold a 2×2 against the side as shown (Again, I didn’t have help so I sandwiched the 2×2 against the wall instead).

With a pencil, draw 4 straight lines to mark where the cuts will be made.

Again, using the miter saw (#1 in tools), cut along the lines you just drew. Repeat the process on the other side where the second ‘x’ will be. You should end up with two #13’s and two #14’s in lumber.
Screw on #13 in lumber as shown by the arrows. Remember those pilot holes!

Now attach #14 in lumber

I screwed this piece on as shown in the two pics below.
…and you guessed it, more pilot holes!

Side Walls:
Now, let’s finish the side walls. First, measure the distance as shown.

Next, cut out your five side wall pieces (#9 in lumber) to this measurement.

I used 1-1/4 inch screws (#2 in hardware) to tack each board to the inside of the ‘x’. This held them in place until I was ready for the next step.
Next, screw on the two #10 pieces in lumber. This will secure the #9 in lumber pieces together.
I secured the ends of my #10 pieces in lumber with some 2-1/2 inch screws (#1 in hardware), as shown. Now, repeat the process on the other side where the second ‘x’ is.

Top and Table Top:
Screw on the table top pieces (#6 in lumber) and the top shelf (# 7 in lumber).

I screwed on the top shelf (# 7 in lumber) as shown in the pic below. Be sure to center the top shelf before you screw it down. My picture doesn’t show it centered.

Middle Shelf Braces:
First, screw on the last two shelf braces (#3 in lumber) with 1-1/4 inch screws (#2 in hardware).
To screw them on, I drilled my 2-1/2 inch screws (#1 in hardware) at a diagonal and countersunk the heads of the screws. Also, drilling pilot holes first makes this so much easier!

Next, screw on the seven middle shelf braces(#18 in lumber) using the 1-1/4 inch screws (#2 in hardware).
Back:
First, center the back slats (#11 in lumber) and screw them on with 1-1/4 inch screws (#2 in hardware).

Make sure they are secured so that the ends stop just below where the top shelf starts.

Doors:
First, with the 1 inch screws (#3 in hardware), screw together six door slats (#15 in lumber) and two door braces (#16 in lumber) as shown. I screwed them in from the back.

Although I screwed it together from the back, the red dots show where I put my screws.

Time to cut out the diagonal door brace (#17 in lumber). Simply place the 1×4 as shown.
Now, draw two straight lines, as shown, to mark where to cut.
Next, cut along the lines with the miter saw (#1 in tools) and it should fit right into place. Screw it on.

Although I screwed in from the back, the red dots show where I put my screws.
Now, repeat the process. You should end up with two doors.

Sanding and Painting:
First, you will want to use the rotary sander (#4 in tools), to get rid of rough spots.

Now. apply one coat of Stain/Polyurethane (#1 in miscellaneous), and let dry. Remember, the pecan color had a little more orange in it than I expected so if you choose this color, be sure to do a test spot before applying.
Last, apply one coat of Indoor/Outdoor Spar Urethane (#2 in miscellaneous), and let dry.

Adding Hardware:
Be sure to use 1 inch screws (#3 in hardware) to mount all the hardware.
First, mount the two handles (#7 in hardware) on the doors.

Next, mount four decorative metal straps (#4 in hardware) on the doors and two corner brackets (#5 in hardware).

Now, mount the five decorative hooks (#5 in hardware) underneath the top shelf.

Next, mount the two metal shelf brackets (#6 in hardware).

Now you are ready to mount the doors by adding the four hinges (#10 in hardware).
Next, screw in one double magnetic catch (#8 in hardware).

Last, be sure to screw in the matching metal latch where you want it to close so that when the door is closed, the tab meets up and touches the magnet.

You are Finished! Enjoy your new, beautiful piece of furniture!
Let me know how you like this DIY Farmhouse Hutch / Potting Bench in the comments below! I love to hear from you!
DIY Farmhouse Hutch / Potting Bench
Sharing at these great link parties:
Busy Monday. Inspire Me Tuesday. The Hearth & Soul. Metamorphosis Monday. All About Home. Follow the Yellow Brick Home. You’re the Star. Inspire Me Monday. Inspire Me Monday. Wonderful Wednesday. Creative Muster Party. Wow Me Wednesday. Your Whims Wednesday. Tuesday Turn About. Homestead Blog Hop. Tuesdays with a Twist. Wonderful Wednesday. Simple Homestead Blog Hop. Share Your Style. To Grandma’s House We Go. Centerpiece Wednesday. Vintage Charm Party.
More great link parties I’m sharing at:
Thinking Out Loud. Party in Your PJs. Thursday Favorite Things. Keep in Touch. Encouraging Hearts and Home. Funtastic Friday. Friday Favorites. Happy Pink Saturday. Dare to Share. Saturday Sparks. Create, Bake, Grow & Gather. A Morning Cup of Joe! Embrace Your Style. Happiness is Homemade. . Inspire Me Monday. Love Your Creativity.
Dee | Grammy's Grid
Looks nice, I like it! Thanks so much for linking up with me at the Unlimited Link Party 25. Pinned!
Tee
Thank you, Dee!
Joanne
That is absolutely beautiful!!
Tee
Thank you, Joanne! I appreciate that!
Janet
This looks like an antique that you refinished. I love that you created it new. Your tutorial is very detailed, I think I can even make it. As soon as I figure out where I can put it I’m going to try.
Tee
I’m so glad you like it! Thank you for your sweet comments! They are truly appreciated!
Cecilia
I repurposed a potting stand as hutch too! Your handmade tutorial is fabulous! Thanks for sharing at Vintage Charm!
Tee
Thank you so much, Cecilia, for you kinds words!
Katie Mansfield
You have such great tutorials. This is adorable.
Tee
I appreciate that, Katie! Thanks!
Dash
Hi Tee, Such a great project & you did such a good job of stepping it out! Thanks for sharing it with us on the hop! https://bloomwhereyourplanted.com/simple-homestead-blog-hop-310/ You are featured in this weeks hop!
Look forward to seeing more from your homestead!
Blessings, Dash
Tee
Thank you so much, Dash! I really appreciate you sweet comments! Thanks for featuring my hutch as well!
Kerryanne
What an amazing project Tee… it looks great. Well done!!
Thank you for sharing your DIY farmhouse hutch at Create, Bake, Grow & Gather this week. I’m delighted to be featuring it at the party tomorrow night and pinning too.
Hugs,
Kerryanne
Tee
Thank you so much, Kerryanne! I really appreciate the feature too!