
DIY Cat Enclosure / Catio – Video
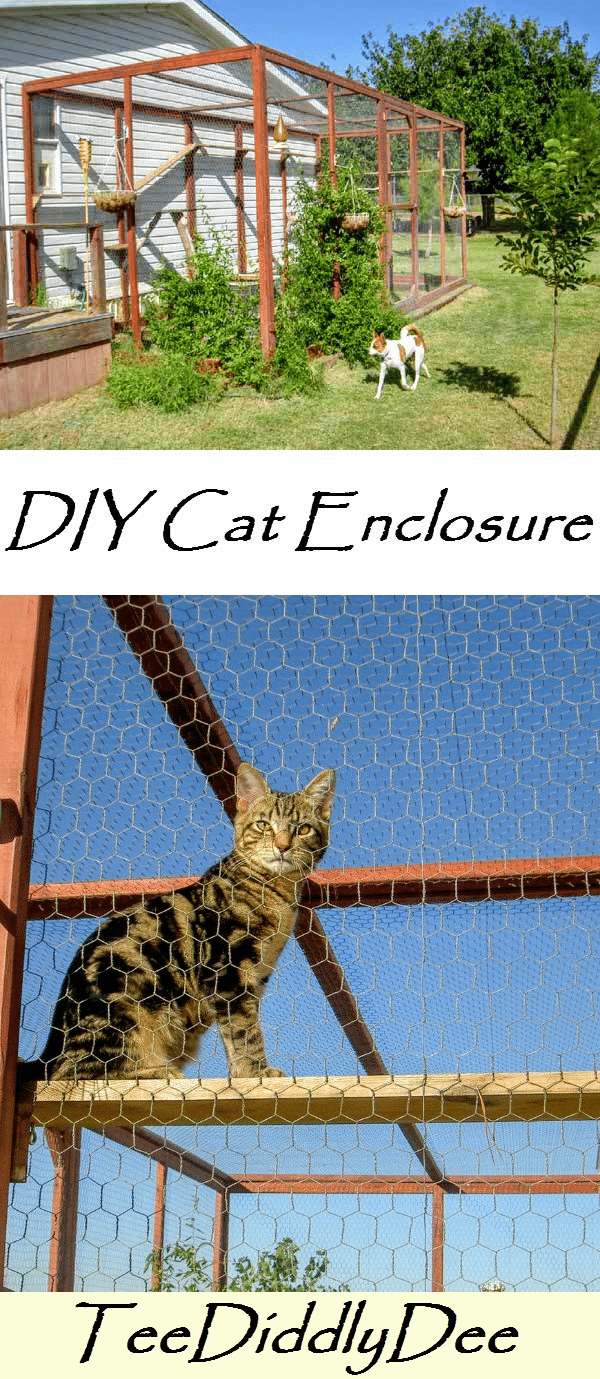
DIY Cat Enclosure / Catio
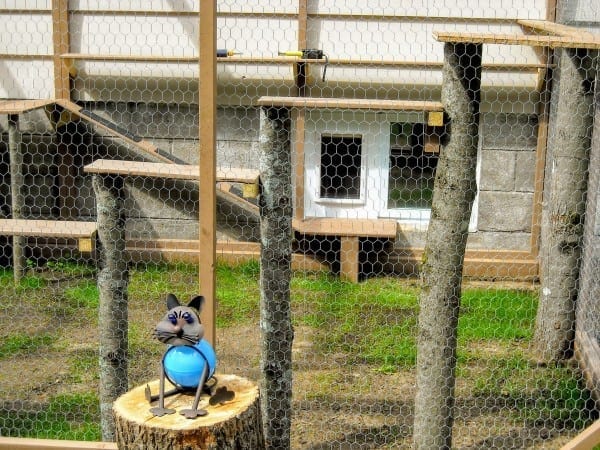
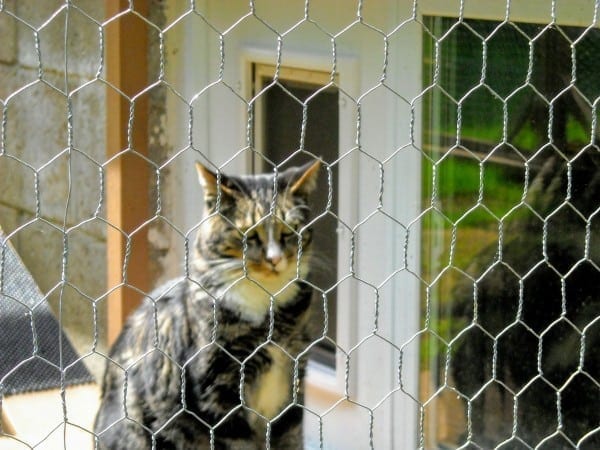
I built this catio a few years ago because I had a couple of adventurous kitties who hated the fact that for safety reasons ‘MOM’ would not let them go out to play. It got to the point that they both would sit and wait by the door for a chance to sneak to freedom every time I entered or left the house…the little stinkers! 😛 So I decided it was time to build them their own outside ‘kitty land’. It’s definitely a large enclosure but can easily be made smaller if you don’t have a large yard.
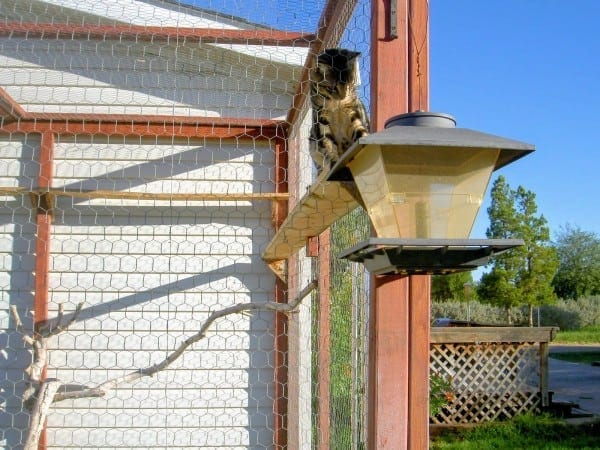
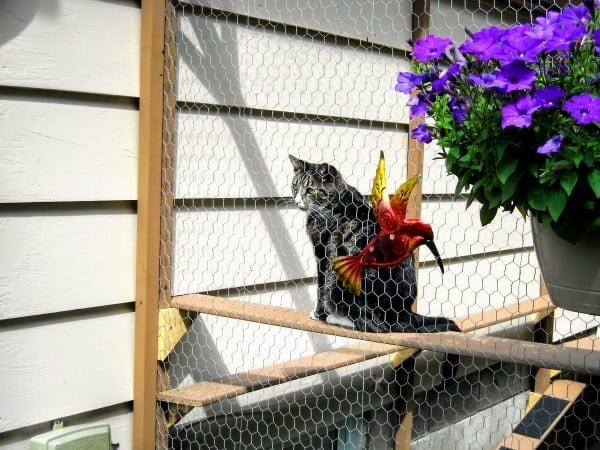
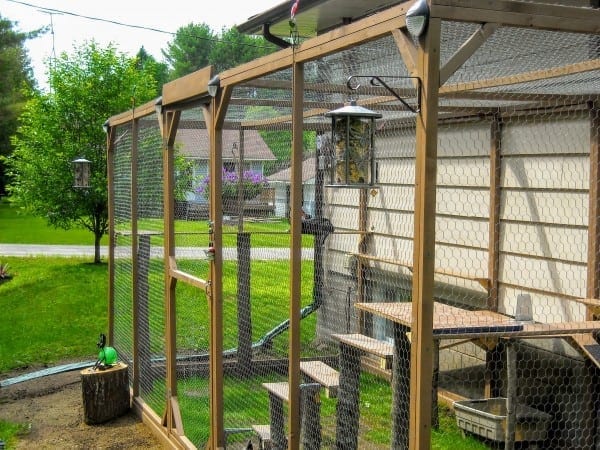
…and also a bird-feeder for the kitties’ bird watching enjoyment!
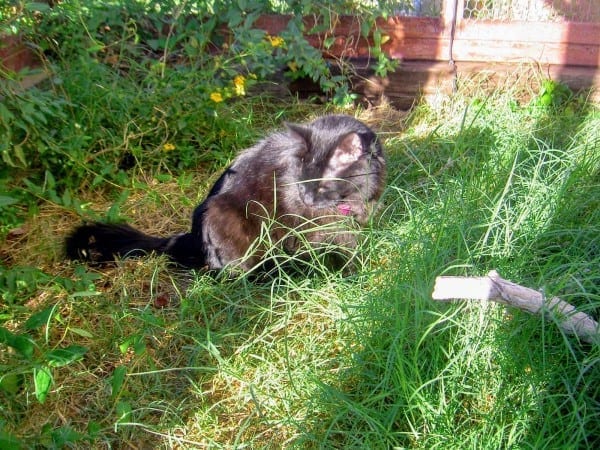
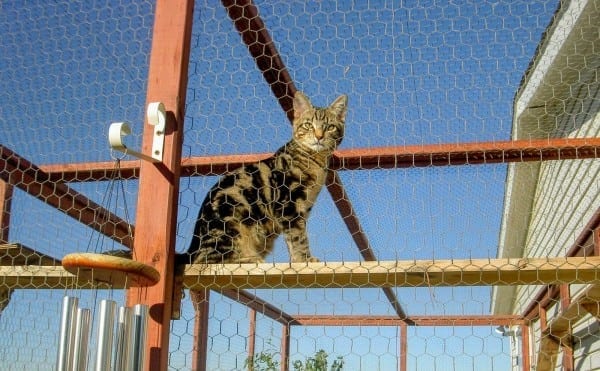
My cats absolutely LOVE spending time outside in their enclosure!
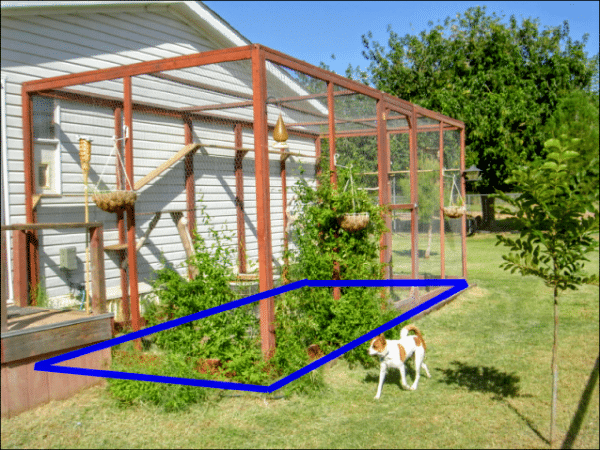
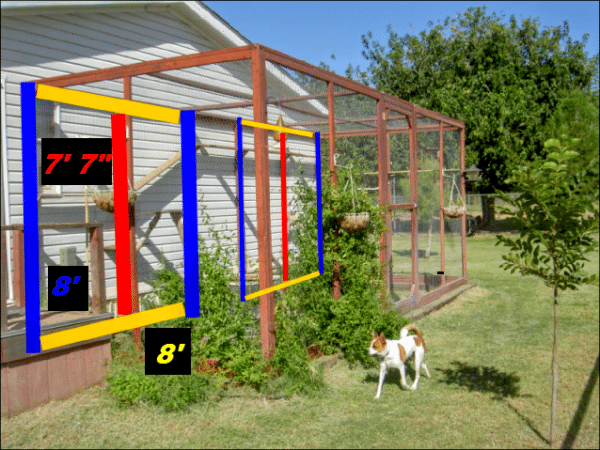
I basically made the whole catio into 11 separate panels that I later assembled: 3 front panels, 3 back panels, 1 panel for each side, and 3 panels for the roof. Oh, and we can’t forget the door 😉 Because this enclosure is made out of individual panels, it’s easily removable if you ever decide to relocate to another house!
DIY Cat Enclosure Tutorial
Want to print out this tutorial without the ads?
Click here to download my DIY Outdoor Cat Enclosure / Catio PDF Printable Tutorial for only $5!
Dimensions:
- Length 21ft
- Width 8ft 6in
- Height 8ft 4in
Tools & Supplies:
Supplies:
- Approx. fifty three 2x3s
- Roll of chicken wire (4ft tall)
- Box 3in screws
- Some 1x6s (for kitty walkways)
- Hinges and latch for gate
- Scrap plywood (platforms for kitties to lay on)
- Railroad ties to set enclosure onto (get enough ties to place around whole perimeter)
- Tree branches (you will screw the plywood platform pieces onto the branches and then screw the branches onto walls of enclosure)
- Some L-brackets (if needed) to reinforce where the 2x3s are screwed together
- Cat door (I shopped around and finally bought mine here because they were the most affordable…it took me forever to pick the one I wanted because of the HUGE selection!!! LOL)
Tools
- Chop saw
- Skill saw
- Hand drill
- Staple gun
- Compressor for staple gun
DIY Cat Enclosure Instructions
First of all, the railroad ties were laid out and leveled…they are the foundation that the enclosure sits on
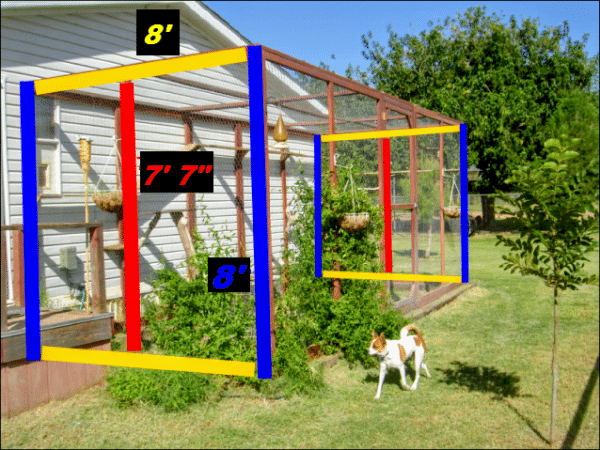
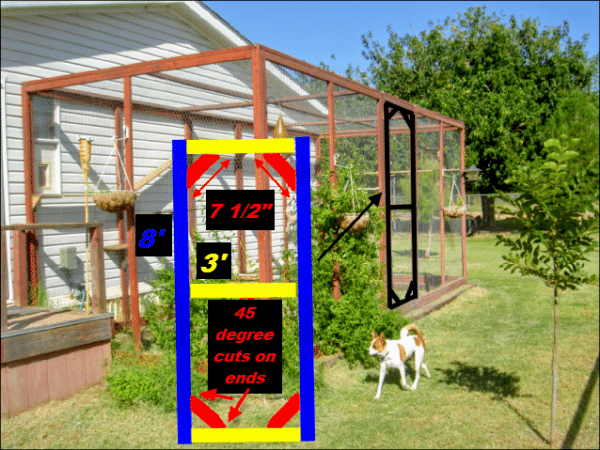
I proceeded to start building the first 8 panels out of my 2x3s…the first 8 panels are all the same size and built the same way. I used the 3in screws to screw all of the 2x3s together. For every panel I built, chicken wire was stretched tightly and then stapled securely before setting it aside to work on the next panel.
Since these next panels were against the house, I didn’t put any chicken wire on them
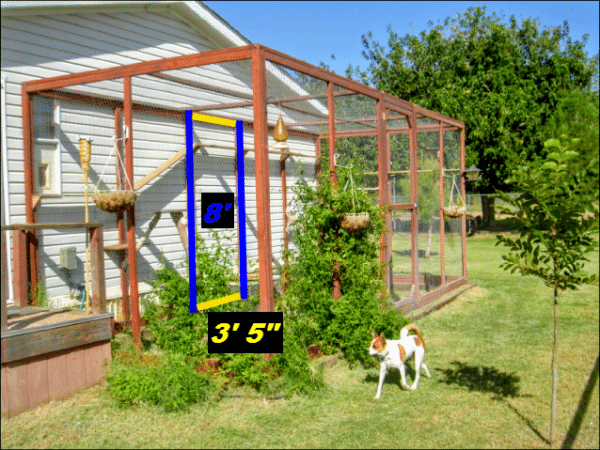
Now for the oddball sized panels…I didn’t put chicken wire on this one either because it was also against the house
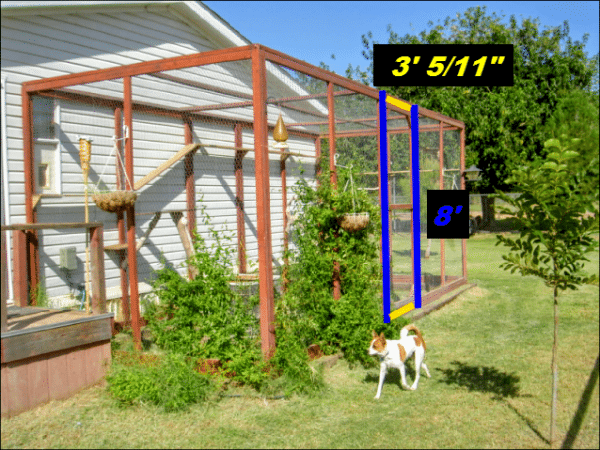
Don’t add any chicken wire to the gate panel! A gate will be built to fit inside this panel.
Chicken wire this panel
Can’t forget to build and chicken wire the gate! After I finished building it, I mounted the gate to the gate panel that I made sure NOT to chicken wire
After the panels were built, I proceeded to erect the enclosure on top of the railroad ties
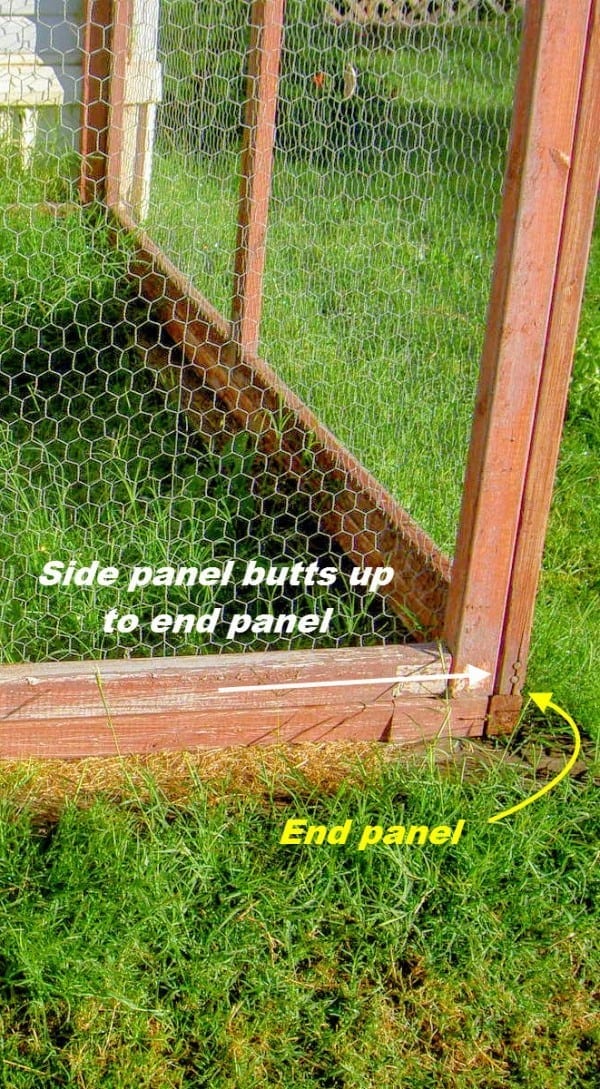
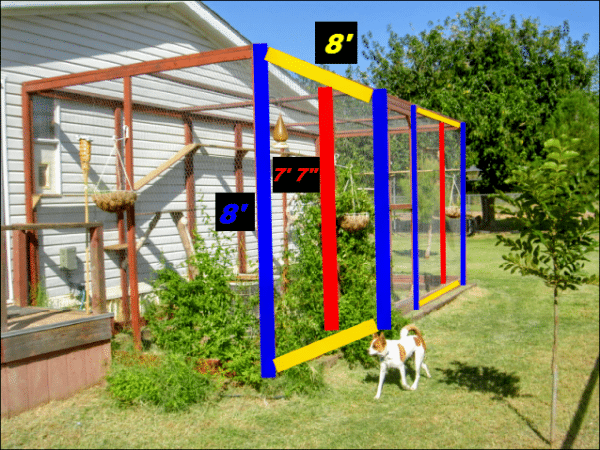
Screw end panels into side panels

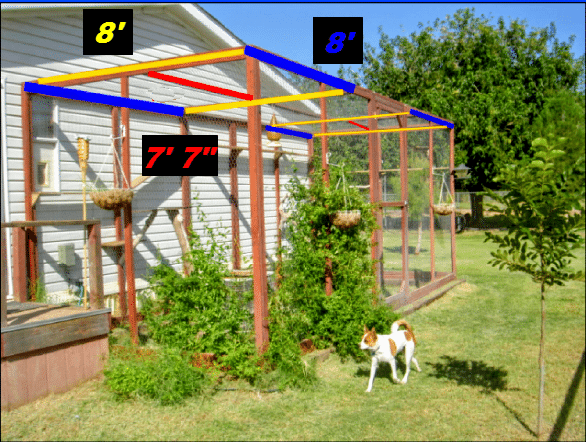
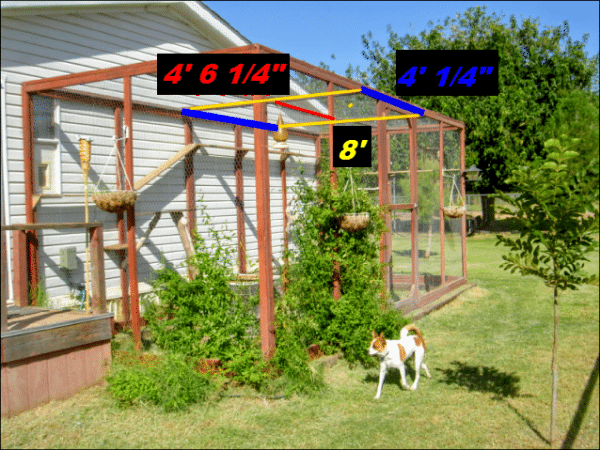
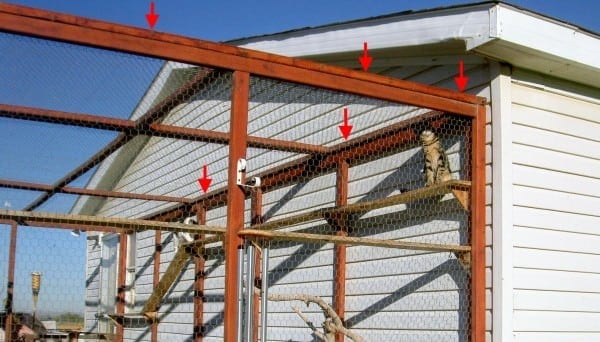
Screw roof panels onto lower panels
After enclosure is erected, anchor with screws to railroad ties
I also anchored the top rail to the house with my 3in screws
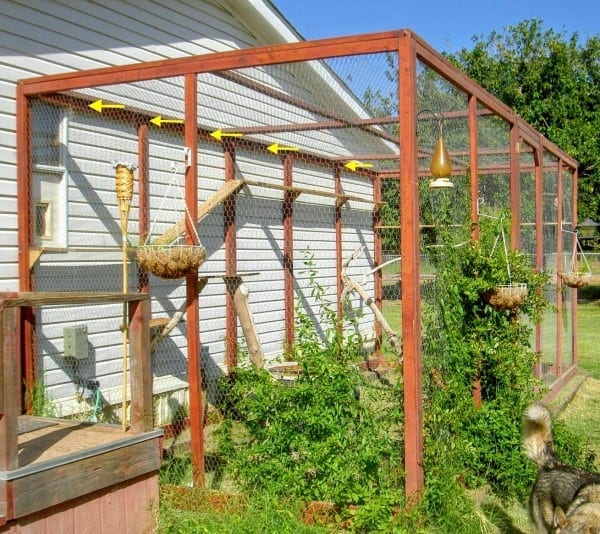
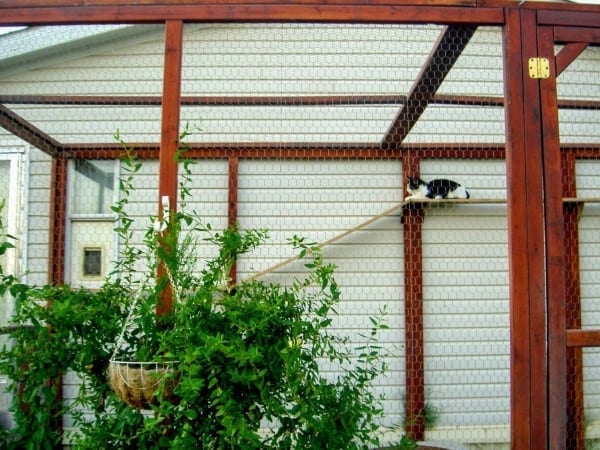
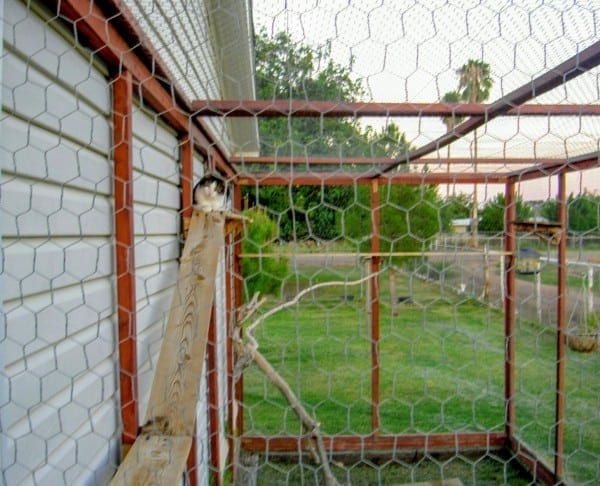
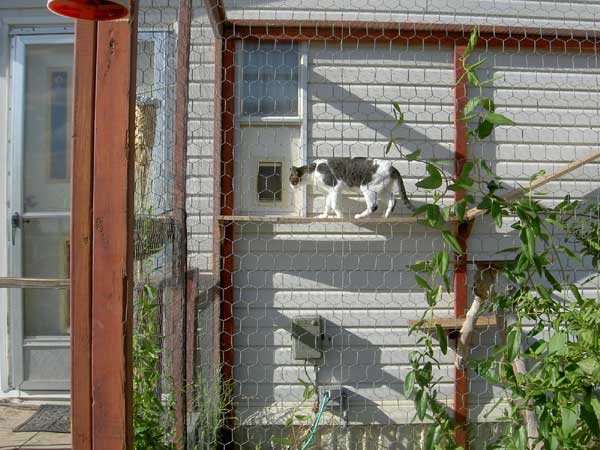
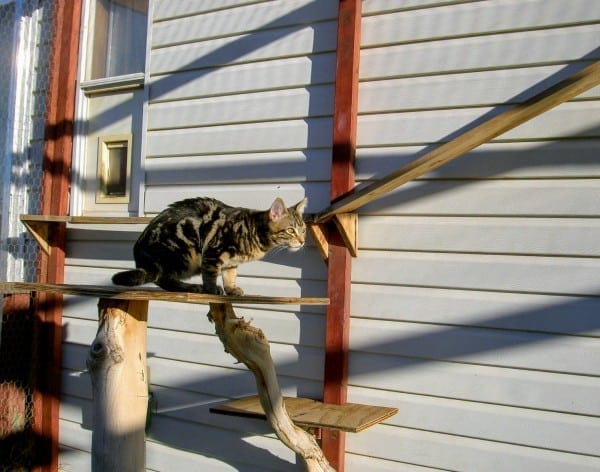
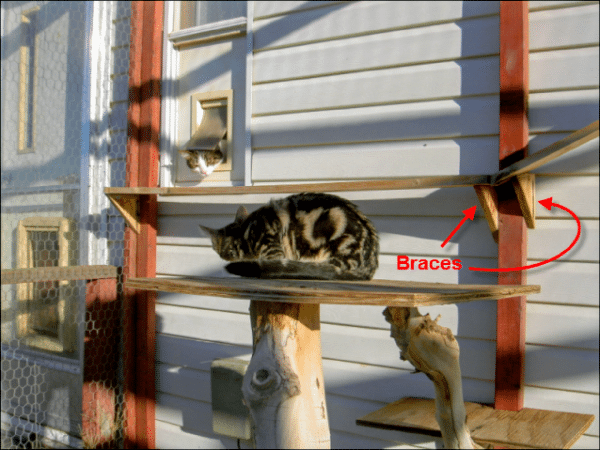
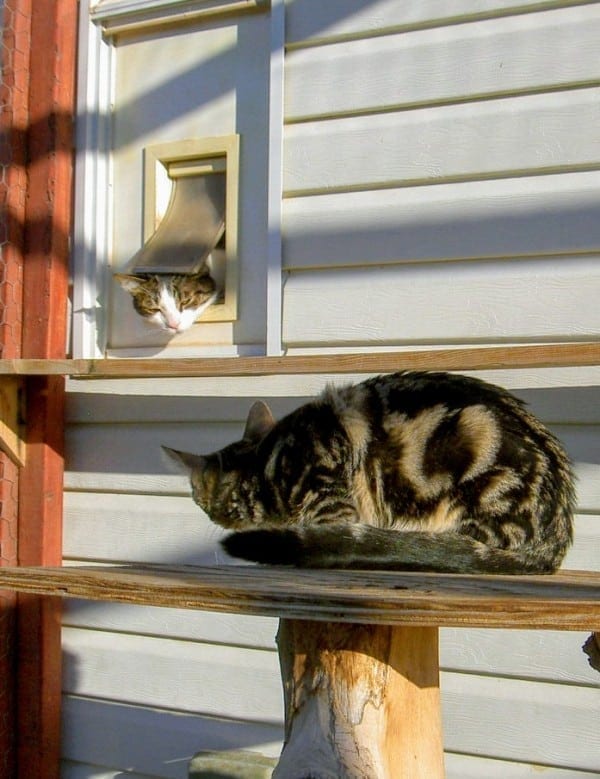
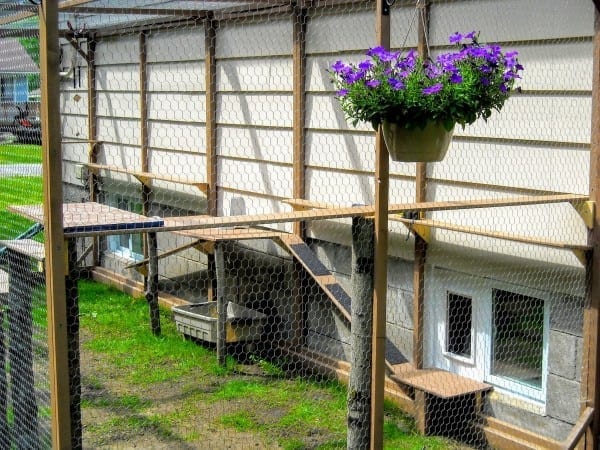
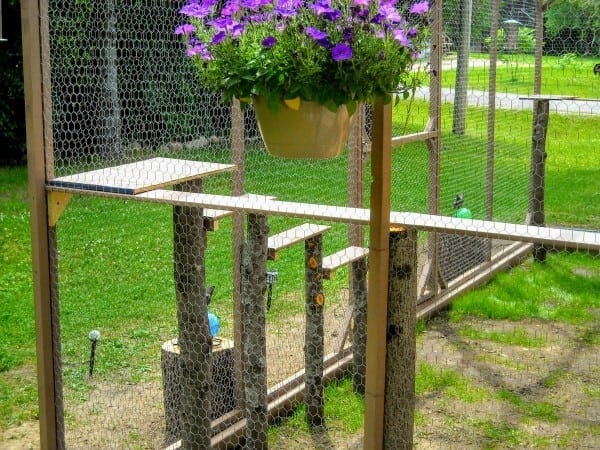
Walkways were built with 1x6s cut to size, while scrap triangles were used as the braces for the walkways
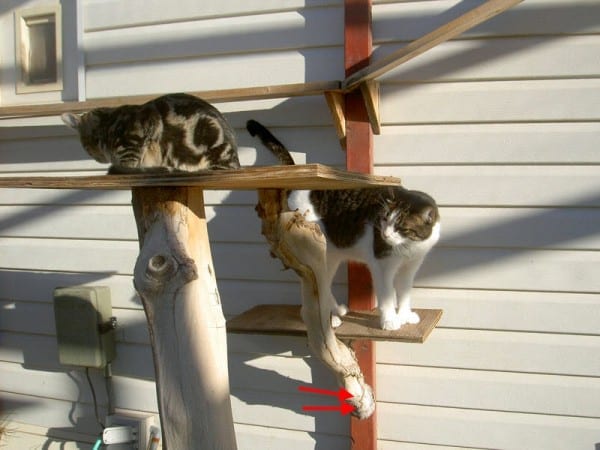
Scrap plywood and old branches were added to make natural looking perches for the kitties to lay on.
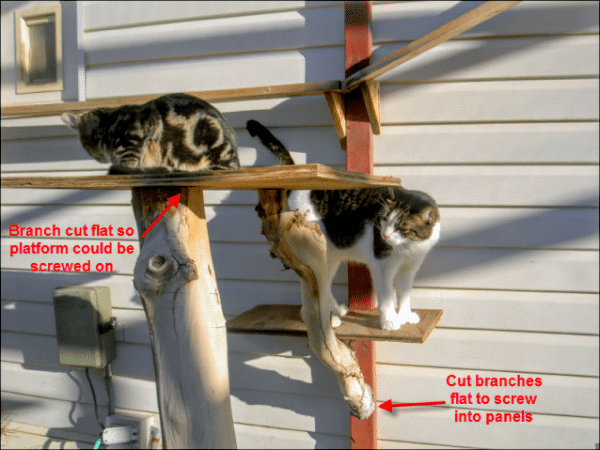
For mounting, I simply drilled a couple of screws through the ends of the branch perches and into the enclosure panel to secure them.
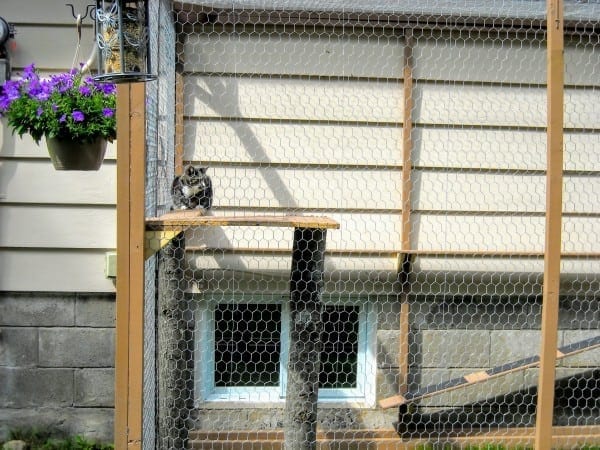
I installed the kitty door into the window so they all could come and go as they pleased! 😉
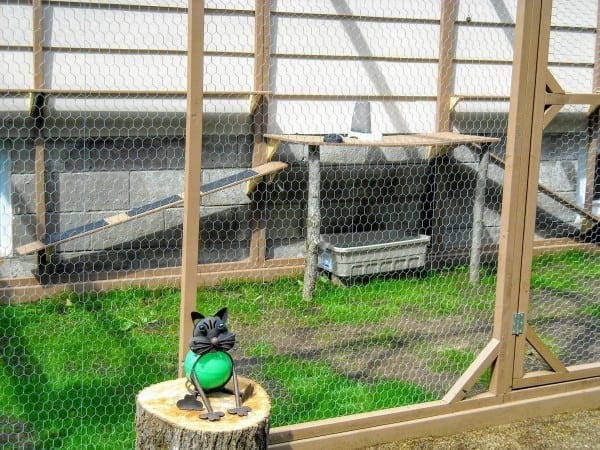
Finished!
Want to print out this tutorial without the ads?
Click here to download my DIY Outdoor Cat Enclosure / Catio PDF Printable Tutorial for only $5!
Update:
David and Susan from the small town of Bancroft in Ontario Canada made a fantastic kitty enclosure, using my tutorial as a guideline. It turned out beautiful!!
Lots of creative perches and walkways for the kitties…
Since they wanted pressure treated wood, 2×2’s were used instead of 2x3s for the framing, to save on money. Also, notice the solar lights they added to the top of the enclosure…great idea!
Although not shown, they added 12in tall screening around the whole bottom parameter of the enclosure, since a few little chipmunks and frogs were getting in by crawling through the chicken wire.
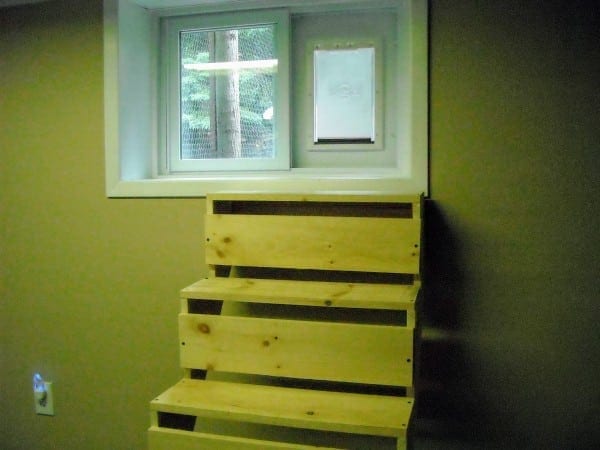
Here is their kitty door, installed into the basement window. To save money on the stairs, they went to Home Depot and traced the outline of a stair stringer onto a board. Then they went home, cut out the pattern, and put the stairs together using cheap pine. Clever!
David
hey there….im in the process of building my own cat enclosure based on your model….one question….your diagram shows that you screwed down the top panels from above…i see no problem doing this on the sides and front of the enclosure…however i see a problem doing this at the back(where it attaches to the house)..how did you do it?….thanks
Tee
Hi David! Good question!!! First I screwed in the top everywhere that I could reach. Then I actually made a ‘bridge’ out of a piece of plywood and a ladder. I secured the plywood to the ladder, layed it across the top, and was able to scoot across my ‘bridge’ to where I wasn’t able to reach before. Hope that answers it for ya!…and I’d LOVE to see some pics when you’re done! 😉
[email protected]
David
for sure i will send you some pics….i have been wanting to build a cat enclosure for awhile now and had looked at a number of ideas on the internet and when i found your design i knew it was the best one for me.The winters are very cold and snowy here so i dont intend to leave the enclosure up year round but with the way you ve designed it i feel i should be able to take it apart and store it for the winter and then re assemble it in the spring.
We have all the panels built and tomorrow we plan to attach the chicken wire and and then get everything screwed in place.
Tee
AWESOME!!! Your kitties are gonna love it! 🙂
Tina Marie
One of my babies looks almost identical to one of yours
Tee
He sure does!
Tina Marie
Hey I was curious when you wrote the amount of 2×3’s you wrote approximately so I was wondering if 53 was the actual amount needed to build this enclosure or if that was a ballpark guess because I’m not sure if they don’t provide it where you live but where I live when you get wood from Lowe’s or home Depot they will cut it to whatever size you need it cut to as many pieces as you need cut as long as you purchase the wood from them of course so I need to know like the exact amount of all of the pieces of wood before I go and get the wood to build this catio because I’m going to have them cut it for me to make it a little easier and less work because I have selective laziness it’s like selective hearing kinda but not really 🤔🤦🤣
Tina Marie
Had to add this picture of my baby that looks like your baby because it’s too cute to not share it with you he’s having a really good dream based on the fact that he’s literally smiling
Tee
He’s cute! lol
Shaina
How long was the chicken wire? Also I would need to build a platform since it floods here what would be a good option. I’m also not able to anchor it to the house so can I do this without anchoring it to the wall? And how exactly did you connect the panels so that they were able to be disassembled later on?
Tee
Since the one I made is permanent and attached to the house, I do not know how sturdy it will be if you build it apart from the house. Perhaps you put pressure-treated 2×3 or 4×4 posts (4 feet apart) into 1-1/2 foot deep holes in the ground, then fill the holes with concrete and let it sit over night, that might give you a sturdier base to build upon. Let me know how it turns out and good luck!
Shaina
I would have to make the catio temporary. Also this is for my outside only cat for safety do you think this could work for that??
David
attaching the chicken wire to the panels took quite a bit longer than i expected and so we didnt get the enclosure erected yet…i ll have to wait until next week before i can get back to it…..so i was wondering if there was a specific sequence that you followed when you erected the panels……any tips and hindsight would be greatly appreciated….thanks
Tee
Actually you are moving along faster than I did! Since it was only me it took about three weeks to finally get mine erected…LOL
I started assembling at one end of the enclosure, the side, front and back. After I had three walls up, I was able to put the top panel on which held everything in place. Then I moved to the middle walls, then the middle top, then the other end of the enclosure walls, followed by the end top.
David
i was actually thinking of putting it together that way…..if you managed to build and erect the enclosure all by yourself than i am pretty impressed….you must be one determined woman….
Tee
LOL…thanks, you have no idea! 😉
Erin O'C
Hello! I am looking into creating a cat enclosure for my baby to keep her safe when I leave for college this fall. I’ve been looking around at pre-made dog kennels, but not finding any with the height I like. I found your beautifully documented cat enclosure and would love to use it as a model. I’d just like to know about how much it cost you and where you bought your supplies. Thank you 🙂
Tee
Hi Erin, I’m so glad you stumbled across my site! My kitty enclosure cost me roughly $150 for everything…which is MUCH cheaper than buying a pre-made kennel, AND more spacious! I bought all of my supplies from Home Depot and Lowes because they are very similar in pricing, AND the most affordable. I’ve had my enclosure almost 10 years now and it’s still a big hit with my babies…and with anyone who visits me, as it’s entertaining to watch my kitties’ funny antics as they explore the great outdoors 😉 If you have any more questions about building yours, please let me know!! I’d also love to see some pics of yours when you’re finished!
Tee
[email protected]
michelle charleville
Hi I love all of these ideas BUT i’ll be moving soon and want to make sure this can be disassembled and reassembled at our new home AND be big enough for 8 kitties.
Tee
Hi Michele! Yes, because I erected this enclosure with pre-made panels that I made, you’ll be able to disassemble the catio and reassemble it at your new house 😉
Kate
Hello…After seeing your instructions my heart finally stopped feeling so heavy. That’s because during the last month one of our cats ran away out of fear of the neighborhood bully cat (fortunately we just found him!), and the other was attacked. Our vet bill is $700 and everyone keeps saying, “Don’t ever let them out again!” I can’t bear the thought of them not being able to come and go as before, but I want them to be safe.
My question is, will an enclosure like this REALLY be a satisfactory replacement for their former freedom? I want to believe it will, but so many of the stories I am reading about cat enclosures are used by cats that have almost always been indoors.
Does anyone have suggestions about how to make one of these enclosures satisfy 6 year old cats that have been outdoor/indoor their whole lives? Thanks!
Tee
Hi Kate!
Yah I hear ya, one of my beloved kitties was actually killed and another attacked by a dog costing me about $500 so sew her back up at the vet’s. It was those two incidents that prompted me to finally build my enclosure for them. Unfortunately there is nothing that will ever replace their ‘freedom’ from being able to roam but this large enclosure is definitely the next best thing. I have found that if you add lots of things to entertain them like walkways, things to climb, birdfeeders on the outside (they will watch the birds for hours that come right up to them as the birds land on the feeders), etc., your kitties will adjust much easier from not having their normal ‘freedom’ instead of just locking them up in the house forever. I’ve even thought about adding a small pond with goldfish for my kitties to watch 😉 By the way, my cats are still able to hunt and over the years have brought in ‘presents’ from their outdoor enclosure: Lizards, mice, gophers, even a small bird…anything that can squeeze through the chicken wire is fair game (I’m still deciding if this is a good thing or a bad thing LOL) If you DONT want them to be able to hunt, I suggest smaller chicken wire 😉 Anyway, I hope this helps and if you have any more questions feel free to ask! If you do end up building an enclosure I’d love to see pics when you are done! 😉
Kate
Gee, thanks for the input. At least you are honest about the enclosure not being a total replacement for roaming about. But I like your comment about the enclosure making it easier for them to transition. I’m hoping that since it’s starting to get colder and darker, if I can get this thing built before the snow flies they will want to be indoors most of the time anyway. And by spring they might have adjusted. So…I need to rally some friends because my husband thinks it’s a silly idea. Will keep you posted if/when the project is completed.
Tee
No problem Kate!…and yes, by springtime it will be a nice treat for your kitties after being cooped up all winter in the house 😉
Hahaha…yah back when I built my enclosure my husband (at the time) wasn’t too thrilled on this either. He also thought it was a silly idea but I was determined and built the whole thing anyway all by myself. It took me about 3 weeks of putting it together in my spare time so if you have some help, it will definitely go a lot faster! Since then I have never regretted putting it up as it’s been a few years now and my kitties still use it daily. Ohhh and one more thing, I was just recently contacted by HGTV Gardens…come to find out they love this enclosure and are going to put it up on their website! Ahemmm…I guess this ‘silly’ idea isn’t so silly anymore??? LOL LOL LOL 😉 😉 😉
Kate
Woohoo…Finally got my DH on board. And speaking of boards, I wanted to ask about those 2×3’s mentioned in your list. Someone told me this size is notorious for being warped. When you bought them did you have a hard time sorting through to get enough straight ones? And do you feel they are substantial enough? I just did some preliminary pricing and using 2x4s would definitely put the materials close to $300.
Tee
Ohhhhhhh YAYYYY!!! Things should go really fast now! AND yes, 2x3s can be notorious for being warped but because of their cheap cost, I’ve learned how to get around that, and have been building with them for years. The trick is to go to the back of the pile… then move the top ones away and dig down to the second or third layer of the pile. This is where you will find the good ones! Hold one end up to your eye and let the other end sit on the ground. Give each one a good look-over. If it’s warped YOU WILL SEE IT!! Because I used 2x3s instead of 2x4s, my enclosure cost me about $150 in all to make. It’s been about 8 years since I built it and everything is still holding up just fine…just make sure to seal it every so often with a good weather protector 😉
yevonne
Did you bury the rail road ties? Are railroad ties necessary if I build this on a patio?
Tee
Hi Yevonne,
I did not bury the railroad ties but if you are doing this on the patio you won’t need them. I irrigate my yard and the railroad ties simply keeps the enclosure frames off of the ground from moisture and lengthens the life of the wood.
David
i needed a design that would allow me to take down the pen for the winter months and then re-assemble it in the spring.The individual panels allow you to do this nicely.Unfortunately for the kitties the unit came down today so they will be indoors over the winter but come spring they will have their play time again..
Tee
I’m sure your kitties are sad to see the pen taken down but they will definitely appreciate it when you erect it next spring! 😉
Betty
Hi Tee,
I plan to build an enclosure for my cats here in the next month and amexcited by your diagram. I want to build one that is about 34ft ×30ft and 8ft tall. Could you tell me about how much more materials I would need to make my enclosure? And how can I get a step by step instruction for building it? I’m not too handy with dig projects but a determined to complete this one for my furbabies! Help please!
Tee
Hi Betty!
Wow, that is gonna be one HUGE play area!
My enclosure is 21ft long x 8ft 6in wide (square footage is a little less than 189 square feet). Your 34ft x 30ft enclosure would be 1020 square feet which is 5 times the size of mine. My enclosure cost me around $150 to build so multiply $150 by 5 to get the cost of what your enclosure will be ($750) Since my enclosure is long and skinny, I was able to save money by using 2x3s (they only come in 8ft lengths) to build the entire enclosure including the ceiling. Because your enclosure will be a much larger square, you will have to do some improvising on my design such as using some kind of support for the ceiling panels such as beams buried into the ground that reach up to the top of the enclosure. Also you need to figure out how many panels you will need to build. In all, my enclosure has a total of 13 panels:
8 large side panels, 3 ceiling panels, and two smaller side panels (one that is used for the gate
With your dimensions you would need:
14 large side panels, two smaller side panels (one that is used for the gate), 12 large ceiling panels, and 2 smaller sized ceiling panels
As I said before, the ceiling is going to be tricky for that large of an enclosure. With my design, the ceiling stabilizes the side panels but with a much larger enclosure, you will need some kind of stabilizer beams buried into the ground to support the ceiling, otherwise the walls will not be sturdy.
Honestly I think for an enclosure that size I would build something a little more permanent to save myself from having to build all those panels and then on top of that, have to figure out the ceiling panels…it would be interesting to see what you come up with ;)…and if there is anything else you have questions on don’t hesitate to ask! 😉
Kelly
I love your catio! I was wondering if you could help figure out how much materials I would need to build my own. I’m looking to build one about 5 feet wide on the sides and about 15 feet long and like 6 feet tall with my house in the back.Thank you for you time!
Tee
Hi Kelly! Thank you! My catio cost about $150 in materials to build. Yours would be a little smaller than mine so I would say approximately $100…give or take a little 😉
Daniel Connolly
I found this site as I was looking for ideas for a cat enclosure also. Thank you so much for your ideas. I,m glad you added the comment about waterseal as I’m sure the Az. sun is just as brutal as southern Nv. and now the Ca. desert.
On a personal note I’m sorry your ex didn’t work out, but I’m also sure there is the right guy out there for you. Of course it’s going to really be hard for him to be strong enough in his self image to measure up to your strength and freedom loving personality. Thank heavens I’m waaaay too old for you!!! But I would like to know more about your ranch. How about you posting pictures of your normal day and chores? I’m sure that would scare off a bunch of those city boys, LOL. Have a great day. Dan
CAROL MONTANA
CATS LOVE TO HAVE FUN AND RUN, SO WHAT YOU NEED NOW IS A BIG RUNNING WHEEL AND MAYBE EVEN AN OLD TREAD MILL THAT YOU CAN CONTROL. IT’S A BLAST TO SEE- FIND THEM ON YOUTUBE BEING LAUNCHED BACKWARDS AND THE RACING TO JUMP BACK ON (EITHER OF THEM) ALSO THEY LOVE A HANGING SWING PLATFORM, COULD BE A STRONG BASKET WITH SIDE AND A CUSHY PAD TO SLEEP ON. I HAVE STRUNG UP A SMALL CIRCLE LOUNGE FABRIC CHAIR 6 FT HIGH IN THE AIR BY WIRE CABLES WHICH THEY ENJOT IT SPINNING AROUND AS WELL AS IT ROCKS BACK AND FORTH.
I HAVE WELL MADE “FAKE CARPETTED TREE DESIGNS” THAT THEY LOVE TO GO FOR THE HIGH PERCH, AND CLAW IT LIKE CRAZY FOR EXCERISE AS WELL. ONE STYLE IS THE GIANT PALM TREE, OF WHICH THE COCANUTS HANGING ARE ACTUALLY SMALL COZY BEDS THEY CAN REEK OUT. YOUY CAN USE ALL THE RT COLORS OF CARPETING TO COLOR THE CORRECTLY. THE RAGGEDY PALM BRANCHES ARE CAREFULLY CUT OUT OF THIN PLYWOOD (LAYING DOWN) AND THEN CRAFTILY COVERED WITH SHADES OF GREEN CARPETING. YOU CAN FIND CARPET SCRAPS FOR FREE BEHIND A CARPET COPMPAN THAT DOES CARPET INSTALLS AND EVEN OLD CRAPET REMOVAL. MOST IMPORTANT IS TO NEVER USE THAT CHEAP CARDBOARD TUBES FORANTY CAT TREE. AND THAT IT MUST BE SECURELY WEIGHED AND LOCKED DOWN IN SUCH A WAY IT WILL NEVER BE ABLE TO TIP OVER.
I HAVE RAISED BENGALS, AND “BENGAL-BOBCATS” FOR THE PAST 17 YRS SO I KNOW HOW THEY LOVE THE HIGH PERCHING AREAS AND TO JUMP AND CLIMB ALL OVER THE PLACE.
ALWAYS MAKE SURE ANY PLANTS THAT THEY CAN GET TO ARE “CAT SAFE” BECAUSE SO MANY PLANTS ARE TOXIC AND POISONOUS! ASLO A RUNNING FOUNTAIN FOR DRINKING WATER IS GREAT , AND FOR THOSE WHO LIKE TO PLACE THEIR DIRTY PAWS INTO THE WATER, PLEASE PLACXE SPECIAL CARPETINGF AROUND THE WATER AREA AND MAYBE A CUSTOM FACE HOLE SO THEY CAN LAP THE WATER WITHOUT CONTAMINATING THE WATER WITH DIRTY “CATBOX” PAWS! AS LONG AS THEY KNOW THAT THEIR NOSE WON’T GET SOAKED WITH WATER BECAUSE THEIR IS A FACE STOPPER., THEY WILL BE HAPPY CAT-CAMPERS!
CAROL MONTANA
ANOTHER TIP FOR SAFETY IS TO ATTACH AN “UNDER PRECTECTION” HEAVY WIRE OR EVEN AN OLD CHAIN LINK FENCE AT LEAST 3 -4 FT IN FROM THE SIDES.
IT MUSY BE EITHER BULL NOSED TIED TOGETHER TO THE BOTTOM OF EACH WALL , OR HORSE SHOE TACKED HEAVILY SO ANY RAVEROUS PIT BUL, WIL DOG, OPOSSUMS AND THE CRAFTY RACCOONS CAN’T DIG UNDER THIS ENCLOSURE.
THEN I WOULD COVER IT WITH HEAVY DIRT AND THEN LENGTHS OF SOD TO HIDE IT AS WELL AS GIVE THE CATS SOME GRASS TO MUNCH ON.
ALSO I MADE WIDE SHELVES UP HIGH FOR THEM TO PLY HOGH AND STRETCH OUT TO SLEEP ON. AS WELL AS HIGH SELVES WITH SECURE PLACES TO SET SKY KENNELS ON (CAT CARRIERS) TO ALSO USE A SECURE CAT BEDS THAT CAN BE REMOVED EASILY TO TAKE A CAT FOR A BATH, OR WASH OUT A CARRIER AT THE SAME TIME. I WOULD RATHER DROWM FLEAS ON A CAT LUXURY SOAK=BATH THAM USE SO MUCH FLEA POISONS ON AN ANIMAL…THERE’S ALWAYS A GOOD POWDER JOB OF “DIATOMACEOUSEARFTH.COM” THAT HELPS KEEP THE FLEAS AWY ANYWAY.
NEXT I PLACE THOSE WAVEY GREEN HOUSE HEAVY RESIN TYPE ROOF PANELING/SHEETS UP THERE FOR THE WEATHER PROTECTION…I USE DIFFERENT COLORS THERE TOO SO THEY CAN FIND A SUNNY SPOT AS WELL AS FIND A COOL SHADE SPOT TO LOUNGE. IT’S FUN TO MAKE IT LIKE A REAL ZOO HEAVEN…BUT THEN I HAVE SEVERAL DIFFERENT ENCLOSURES SO I CAN “ROTATE THEM” WHICH MAKES THEM FEEL MORE FREE TO EXPLORE NEW AREAS & LEAVE THEIR MARK! COMMON SENSE SAYS THEY CAN BECOME BORED JUST AS WE WOULD; SO MAKE FOR THEM A VARIETY OF AMUSEMENTS JUST AS YOU WOULD LIKE ALSO~
Suzy Buck
Hey Lady … You are FABULOUS !!
I am so glad I kept looking at different sites and photos looking for screened cat enclosures. Yours is perfect for what I have been wanting to do for my 5 cats.
The other delightful thing is … you are in Arizona !!
I am in Ahwatukee and plan on moving up to Prescott around Feb or so …
and am looking at ways to have a Cat House on the grass or yard. Your ideas are
perfect and I will use them and will send you photos in the Spring. I will either have a house with a large yard to build a large space, or a charming townhouse where I can size your ideas down to ‘fit within the small spaces’ … with multiple spaces. LOVE IT!!!
Note … Men come and go but Cats Stay Forever !!
Tee
Hi Suzy!
You are just too sweet!!! I’m so glad you found my site and I would just love to see some pics of your 5 kitties enjoying their new enclosure when you get it up! You’re literally about a half hour away from me so if you ever want to come out to get a look at the enclosure in person, you are more than welcome to. I am envious that you’ll be moving to Prescott as it’s beautiful up there 😉 Thanks for dropping me and line and I hope you have a wonderful day!!!!
Melina
I just had a cat disappear last month, still looking, and the other wants to still go out all the time. I am working in letting him out less and less, and do not let him out at night any longer, and I want to build an enclosure for the kitties. We have another who was a rescue, that is indoor only, and I think she might enjoy getting fresh air as well. Do is not keen on it because he doesn’t know how we would mow inside. How do you manage that part with an enclosure this size? This is about silo are to what I had in mind, and lovvvve the individual panel idea!
Melina
Sorry, stupid autocorrect changed some words. That was DH for dear hubby, not do, And not silo, supposed to be sized hat I had in mind. Grrr
Tee
Hi Melina! LOL…no worries, my auto correct does that to me all the time 😉 Oh I’m sure your kitties will just love a new enclosure as much an my kitties! To cut the grass, I simply use a weed eater…takes me about 5 minutes and I’m done. Easy Peazy! 🙂
Al St Aubin
I someone who dis something similar but they bought a chicken coop from a local farm store and then made a small enclosure that attached that to the windows. Great ideas, will probably have something close next spring for our 3 cats.
Tee
Chicken coops work too!…and there are some really cute ones out there that you can buy nowadays 😉
Kandy Grogan
I can FINALLY quit searching! You are bad ass girl! Thank you. My cats are going to be safe and the birds too!????
Tee
Yay! Yep, they all will be safe and happy!
Kandy
Taxes came in mail today. So off to buy the materials you’ve listed. Soooooo excited!!!
Tee
YAY!! Your kitties are going to love their new enclosure!
Betty Hoggatt
I love your cat house! I am up to 10 cats now and several of them want to go outside. I don’t let them roam free because I want them safe so your cat house is the perfect idea and not too expensive! Going to show this to my husband (who, btw, wasn’t a cat person but is now that we have baby kittens who love all over him) and hopefully we can get started on it soon. I have enclosed screen porches on the back and front of my house which the cats love, but I think they want the feel of the grass and the sunlight. Can’t wait to get started on this!! Thank you for posting your idea!
michelle charleville
yea plans for a catio!! i’m hoping i can trade my portable gas generator and my gas grill to my handyman to supply materials and labor to make this.
one issue is i can’t have it attached permanently to the house or i will require a building permit from my city/county.
how easy it this to assemble/disassemble?
it has become imperative for my babies to “stay inside” this latest incident yesterday is making it absolutely necessary to keep them safe from harm. Neither i nor the vet knows how he got these bruises but it happened in a four hour period AND this is after most of the swelling has gone down. Scared the daylights out of me.
Tee
Oh my goodness, how scary! Yes, once you get all of the panels made, it’s pretty easy to erect. Since you can’t screw the panels to the house, you’ll have to figure out a way to keep it secure. You could always cement in two wooden posts (one on each side of the enclosure) and screw the enclosure to the posts…
michelle charleville
The only problem with cementing anything is I have a cement patio that goes all the way up to the house.
Lisa
Hi Tee, Thank you so much for posting this awesome cat enclosure and how you built it!! Do you think that this will hold up in snow and ice in the winter months? (I live in Michigan.) Since I read David’s post above, about taking his down in the winter… now I’m wondering if I would have to do the same thing. Any suggestions would be greatly appreciated. Thank you!
Tee
That’s a good question Lisa! What you could do is put larger wire on the top panels of the enclosure so that the holes are too big for the snow to stick, and then just do regular chicken wire on the sides of the enclosure. Here is a good example:
https://www.amazon.com/gp/product/B000RZAP4E/ref=as_li_qf_sp_asin_il_tl?ie=UTF8&tag=teed00-20&camp=1789&creative=9325&linkCode=as2&creativeASIN=B000RZAP4E&linkId=066554c58cc171a22f706b92c67cae12
Tina Marie
Another suggestion would be to add plenty of entertainment aka stimulation for them like cat trees, shelves, toys, bird feeders and ponds are also really great ideas. I’m thinking hummingbird feeders because they are so fast it will surely make for some good entertainment for the kitties. I’m gonna build a catio and plan on adding one of those big cat exercise wheels as well as many other things like one of those mesh tunnels. Also, I’m gonna plant some catnip for them and add some cat safe plants as well as some big tree branches so it’s more like a forest area for my babies because they love climbing trees when I bring them out on a harness and leash. They hate the harness and the leash at first. When I started using the harness and leash method with them they would literally just become paralyzed and basically fall to the floor and get this pissed off look in their eyes and just glare at me like what the heck is this thing…get it off of me! But, then when they became familiar enough with it, they stopped acting like they couldn’t move. They still hated it and tried to bite at it and stuff but they finally realized that in order to go outside we have to tolerate this so they sort of got used to it. They’re still not completely okay with it. Sometimes they still fall to the floor like they can’t move….drama kings 🙄🙀 Picture is the look my cat gave me after me putting the harness on him and he didn’t make it an easy task. 😾
Tee
You have some great ideas to add to the catio! I would love to see your when you are finished!
David
Hi….just so you know I did take my enclosure down the first couple of winters but last year I decided to leave it up and had no issues…im leaving it up again this winter…i just had to go inside and shovel out snow as needed….also I normally pull snow off my roof so I had to be careful not to pull too much at a time cos I was worried about damaging the enclosure….im thinking about putting a roof on mine but not sure about it yet…
Tee
Hi David!
Good to know! I’ve had a few inquiries about the snow issue but since I live where it never snows, I really didn’t know! Thank you!!!
David
It’s been snowing here since yesterday so your comment about not getting any snow seems like a low blow….????
Tee
LOL!! OH NO!!! I’ll try and send some sunshine up to you!! 🙂
Karin
Just a typo… Might be important…”had a couple of adventurous kitties who hated the fact that for safety reasons ‘MOM’ would let them go out to play. ”
You mean…”had a couple of adventurous kitties who hated the fact that for safety reasons ‘MOM’ would NOT let them go out to play. “?
Also “chimp monks” lolol!
Chipmonks?
Thank you for such great instructions and photos!!!
Great job!
Tee
Bahahaha!!! You are right! LOL After hours of writing these tutorials, my eyes start crossing a little. I wonder sometimes how many other typos I have on my other posts! 🙂 Thanks a bunch! Fixing it now 😉
Sova
Tee, awesome work! Im trying to make my own enclosure and I have a question. What screws did you use to attach plank that is on the ground [not on the railtie] to the plank that is standing up. The way planks position > 3 inch face out, you will need screws that are bigger than 3 inch to connect 2 plank pieces from the same panel. How did you do it?
Tee
Hi Sova,
Good question! I actually used 3 inch long wood screws that I countersunk halfway into the top piece of wood so that they would reach into the bottom piece. You can learn how to countersink HERE
Hope that helps!
Sova
Great! How many screws did you use? 2?
Tee
I used two for each end and and added two in the middle of the board just to keep it from warping later.
Kathryn Miller
Oh my god thank you. You saved my life.
Tee
Glad you enjoyed the post Kathryn!
AC Stew
Thank you for sharing in such detail. I will be moving from acreage to a home in town. I have been searching the net for a site that actually shows me the ‘how to’ instead of just talking about it. This is so very nice. I hope to incorporate a smaller version of this to the side of my new home. Thank you again for sharing.
Tee
Thank you for your sweet comments! I love my outdoor cat enclosure! It gives me peace of mind knowing my cats are safe, but also allows them to go outside whenever they like. Please post a picture if you make one of your own. I would love to see it!
Jennifer
Hi! This is Awesome!!! Our cars have their own house and most of them were once roaming ferals and strays that we took in. Before moving to this place where they have their own house, we had a large scrren porch that they had cat door access to and they truly loved. Now being here, they need an outdoor space. I believe one is necessary for their mental health. We live in the country. Sometimes we can get wind gusts up to 70 mph if the weather calls for it during high winds and storms and where the cat enclosure will go catches a lot of wind. Also we have coyote here. Do you know if this enclosed can withstand high wind gusts and is coyote proof? Also the winter weathet? I read one comment of someone saying they disassemble in the winter and reassemble in the spring. Additionally I would think the ground would need to be completely level for this enclosure right? Thanks for any information you provide and for sharing your catio!!
Tee
Hi Jennifer!
Here in AZ, we have micro bursts in the summer that reach 70mph and sometimes more…my enclosure has held up well during all of those storms. As for coyote proof, I would use a heavier gauge wire instead of chicken wire. You could go with a welded wire found HERE or even go a step further and get horse fence that is basically indestructible by coyotes found HERE.
Since it doesn’t snow where I live, I’m not really sure how it would hold up to snow. I guess it would depend on if the snowflakes would fall through the wire or if it would build up on the wire causing excessive weight. Also, I did level out the ground for the enclosure to sit on. I hope this helps!
Jennifer
Thank you So Much!! I really do appreciate it!!! Hoping we can get an enclosure made for them soon. I just noticed typos in my original question. I meant my cats have their own house – not cars!! I know you knew what I meant, but still embarrassing!
Tee
You’re so funny, I have my share of typos so no worries! 🙂
Jennifer
Hi I have another question, when using the trees as perches etc in the enclosure, do you anchor them and do you know if the other people who put them in theirs if they anchor them somehow and if so, how do they get anchored? Thanks
Tee
I cut the ends of the perches to fit flush with the side of the enclosure panels. Then I simply secured the ends of the perches to the panels with a couple of screws, simple as that. (I would first drill pilot holes before drilling in the screws)
https://www.teediddlydee.com/wp-content/uploads/2019/04/PICT1339.jpg
David
Hi Jennifer….just wanted to pass along some info from my personal experience with the enclosure….im the one who mentioned the idea of taking the enclosure down during the winter and I did in fact do this for the first 2 winters but I have now left the enclosure up year round for the last 3 yrs…so far I have had no issues other than the fact that we need to regularly shovel the snow òut of the enclosure but no issues with stability of the enclosure….i should also point out that while Tiffany built her enclosure with 2x3s I needed to use pressure treated lumber because of our weather issues so my options were 2x2s or 2x4s…we went with 2x2s because it was cheaper and also because I was afraid with 2x4s that the panels would be too heavy to take down and put up every year….i haven’t had any problems with the 2x2s but now that I leave it up year round if I was doing it over I think I would have gone with 2x4s….we used chicken wire on the enclosure….keeps the cats in and most small critters out(except for a couple of chipmunks)…however we did have some type of animal tear a gap in the wire a couple of years back…no idea what did it…maybe a bear…whatever it was didn’t get in and no kitties were harmed but we did do regular inspections for awhile after that..but if you have coyote issues then I would suggest something a little stronger…hope this helps..
Tee
Hi David! I’m glad to hear the cat enclosure is holding up for you! Thanks for commenting!
Jennifer
Thank you for this information. I really appreciate it.
Tee
Glad you enjoyed the tutorial Jennifer!
Shale
Thank you so very much for all the demensions. Im going to be building mine soon. I rescue cats and have 15 right now. I know they will love this. Did you use a 100 ft roll or 50 ft roll of wire?
Tee
Hi Shale! You’ll use approximately 112ft of 4ft wide wire so I would get the 100ft roll. You’ll have to post a pic of your new enclosure when you’re finished. I’d love to see it!
Connie Frazier
I love your catios and will be using this idea to work on some of my kitty issues but I do have one suggestion you may not have considered. I have been building cat fences and kennels for many years and I have come to find the easiest and most economical material to use instead of the chicken wire is a simple bird netting (or some people call it “deer netting”). It holds up for years, can easily be attached with a simple staple gun, is very inexpensive and much easier to work with than the chicken wire… just a thought! Thank you for the AWESOME tutorial!
https://www.lowes.com/pd/Sta-Green-Actual-14-ft-x-14-ft-Bird-Netting-Black-Polypropylene-No-Dig-Garden-Hardware-Cloth-Rolled-Fencing/50119483
Tee
Hi Connie,
Thank you Connie, for your sweet comments! As for the bird netting, if you don’t have any predators or heavy snow, the netting might be a good alternative! In my area, I need to use something that can’t be chewed through like chicken wire as we have dogs and coyotes in our neighborhood. Thank you for your comments though! I’m sure there are others who would find bird netting a great alternative.
Mike Hauschild
I want to deeply thank you for time and effort in posting and answering questions about your enclosure. Very impressive and a great help to many cats.
To skip the details why, I am in great need for an enclosure and have struggled on design and construction. I was extremely lucky to come upon your design and its size and individual panels are perfect as I will eventually be moving it to Prescott.
I was hoping for a clarification answer to the counter sinking…
So for the identical 8 panels… I will be counter sinking those screws all the same way with the
2×3’s oriented all the same way?
Tee
Hi Mike! So glad you enjoyed the post! You live relatively close as I am located in Gilbert, AZ…very cool!
To answer your question: Yes, I countersunk all the screws so that they would be long enough to screw into the other 2×3. All of the panels were done in this same way. Hope that helps!
Gertrude
I am so glad I found your site…thank goodness for Pinterest! I plan to build next week, but was wondering about your thoughts to place on my deck instead of railroad ties. Would it need to be screwed down to the deck?
Tee
Hi Gertrude, good question! If it were me, I would put it all together first, then decide if it needed to be secured to the floor of the deck or not. Hope that helps!
Gertrude
Thank you so much for the quick answer! My family is planning to try this weekend but me being such a novice I have a question…with the panels 8 ft and the wire 4ft…do you secure the wire seams?
Tee
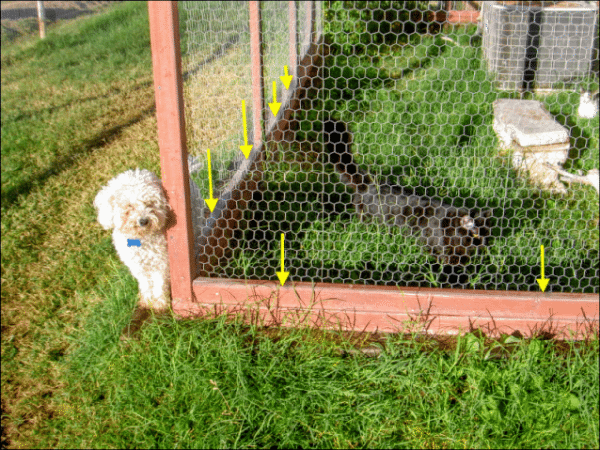
The 4ft wide wire will reach the width of the panels and middle braces nicely. I built it so that you won’t need to secure any wire seems together. Simply roll the wire out lengthwise, top to bottom (see red arrows), and the width of the wire will reach the widths of every panel and middle brace just right.
R. Naka
I hope this isn’t a dumb question, but what made up the base? “After the panels were built, I proceeded to erect the enclosure on top of the railroad ties.” What do these railroad ties look like, how many do I need, and where do I get them? Thanks : )
Tee
Hi there!
Not a dumb question at all 🙂 I found some old railroad ties on Craigslist (you can also use Facebook Marketplace), and used them for the base of my cat enclosure. Railroad ties are about 9×7 inches thick and can be around 8 ft long. I simply leveled the ground, cut the railroad ties to the lengths I needed them to be (with a chainsaw), and then set them on the ground. You don’t have to use railroad ties, but they do keep the panels of the enclosure off the ground, which protects them from standing water when it rains.
Amanda S.
Hi, thank you so much for sharing these plans! I have somehow managed to be adopted by 5 outside cats that have showed up over the years. I have been caring for them since they were kittens. Recently one has disappeared and it breaks my heart. I have looked everywhere, posted to as many social media pages as possible, posted flyers, and been to every shelter in my immediate area multiple times. We finally decided to build a catio for the safety of my fur babies and to limit the stress I am dealing with worrying all the time if everyone is ok or if they are going to come home. Honestly I can’t handle the stress of losing another kitty.
I have made all my plans priced most of my supplies but I have one question I haven’t been able to answer on my own.
Would you mind sharing how you tied the chicken wire together so neatly?
I am planning for large panels to cut down on wood and because I like how it looks but the chicken wire isn’t wide enough.
Tee
I just stretched the chicken wire over each panel and stapled it along the edges. I didn’t have to tie it together. It worked great for me! Good luck with your kitties! You will love the catio! It will give you peace of mind!
Fadi
Thanks for the plan! almost done building ours. We used 2×4, with 4×6 for base. Ours is 24’x8’x8’.7”… We need to finish the door, the window entrance, and come up with some ideas for hanging walkways for them to climb on.
Digging to flatten the base and stapling the chicken wire was the most tiring and time consuming.
Tee
Hi Fadi!
Wow, this is fabulous!!! You did a great job!!! It’s always satisfying after all the hard work watching the kitties play and enjoy their new freedom outside 🙂