

DIY Easy Barrel Train-Video
DIY Easy Barrel Train
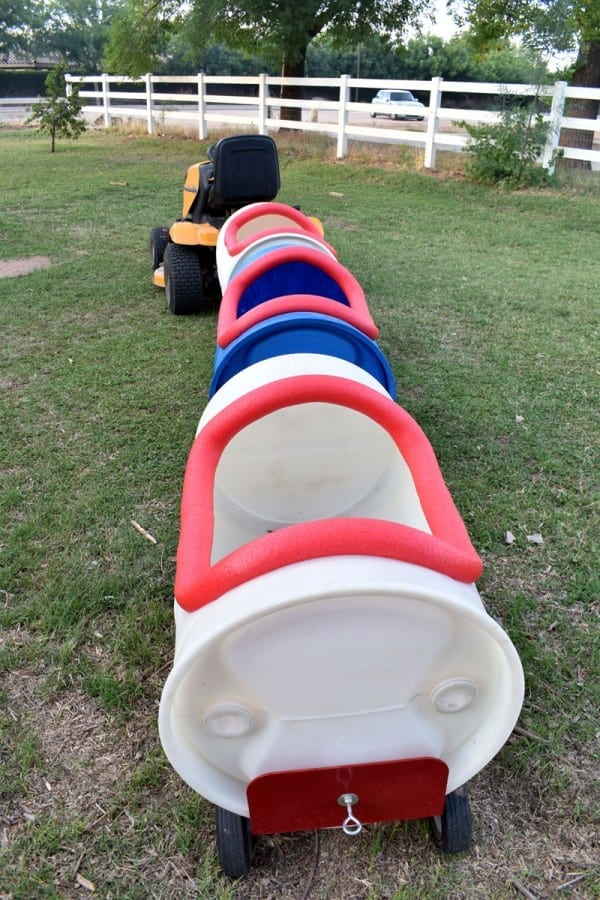
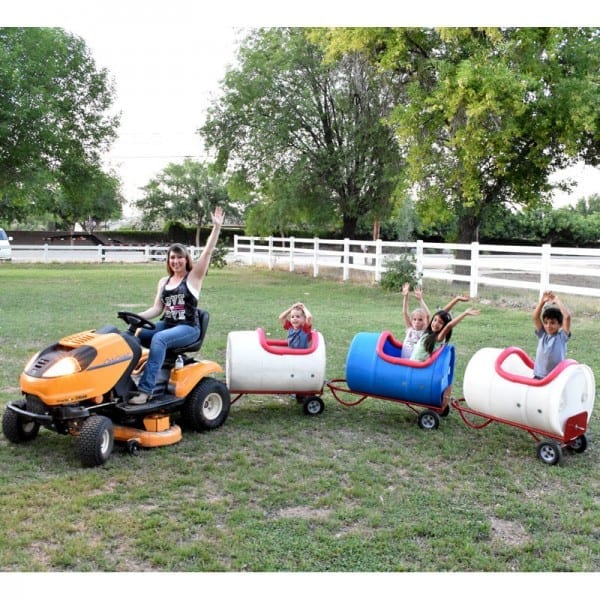
All Aboard!! What kid doesn’t love a train! Barrel trains are always the hit of the party and no one (including big kids like myself) can resist riding in them! They’re great for any kind of party or even parades and they offer endless hours of entertainment for everyone! You can pull barrel trains with just about anything including lawnmowers, 4-wheelers, golf carts, side-by-sides, and the list goes on!
This barrel train that I built is super easy to make and anyone can have a whole train put together, from start to finish, in just one afternoon!
DIY Easy Barrel Train Tutorial:
Want to print out this tutorial without the ads?
Click here to download my DIY Easy Barrel Train PDF Printable Tutorial for only $5!
Tools:
- Hand drill with bits
- Wrenches Or Ratchets for tightening nuts to eye bolts
- Jigsaw (for cutting hole out of plastic barrels)
- Wood-cutting chop saw (for cutting wooden seat)
Supplies:
Body:
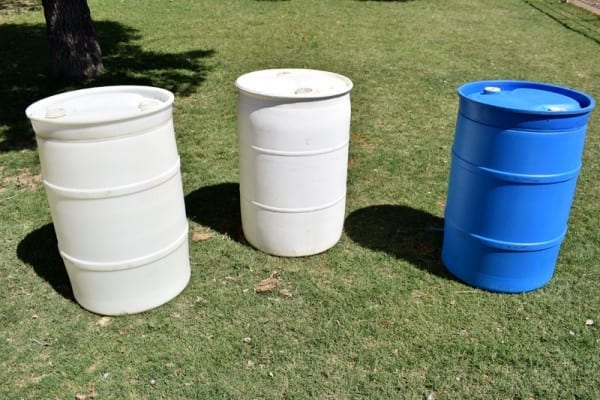
- Plastic 50 gallon Barrels (get as many as you want train cars)
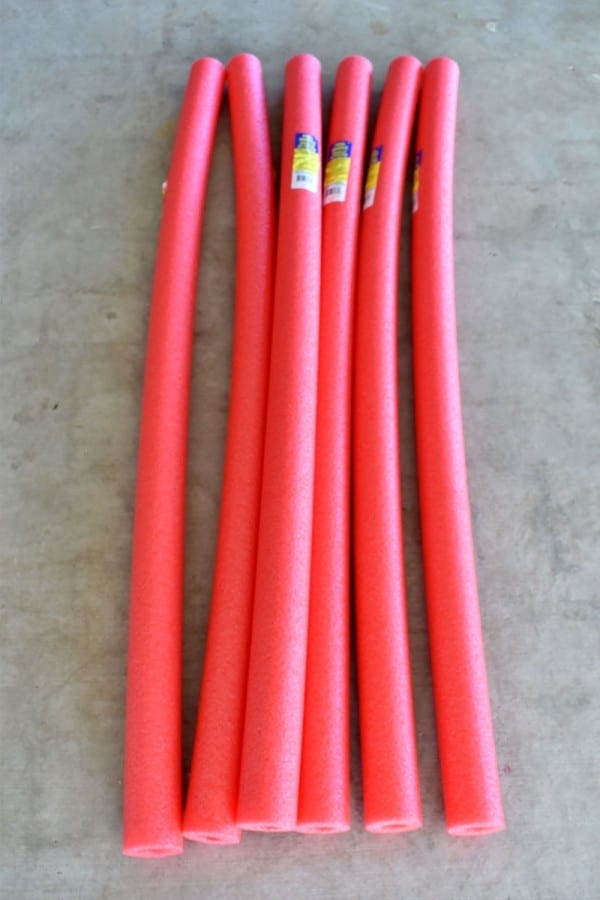
- Pool Noodles-I used these as padding for the center opening of the barrel, and used two (2) noodles for each barrel.
Seat:
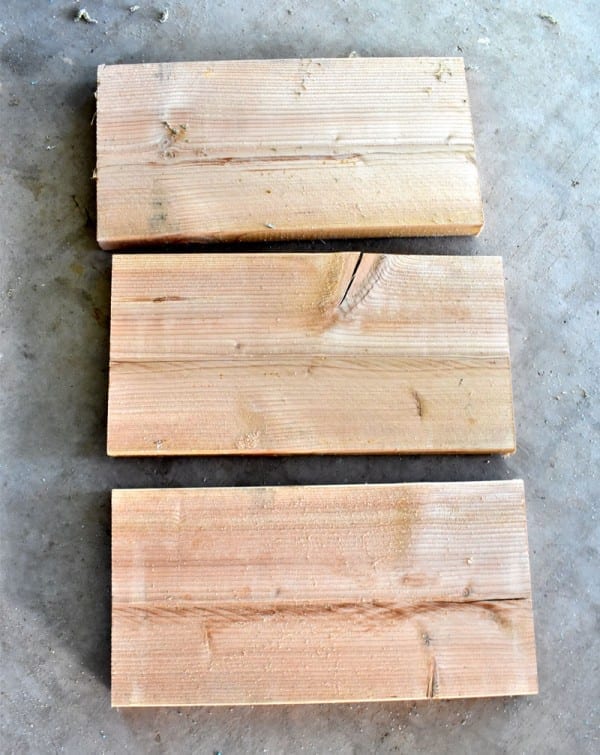
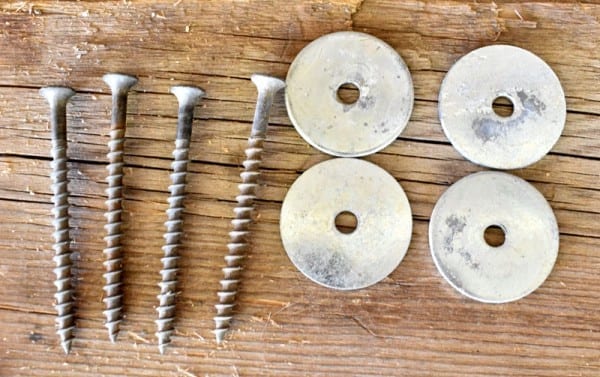
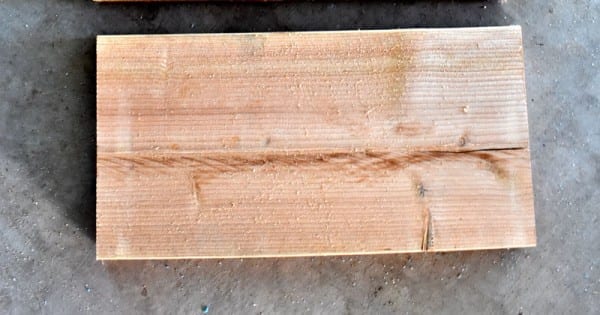
- (2 in. x 12 in.) wood planks cut at 22 in. long (1 for each train car, as this is the seat)
- A set of the following for each seat:
- Wood Screws – (4) 2-1/2 inches
- Fender Washers (4) that fit the screws (to mount the seat)
Base and Wheels:
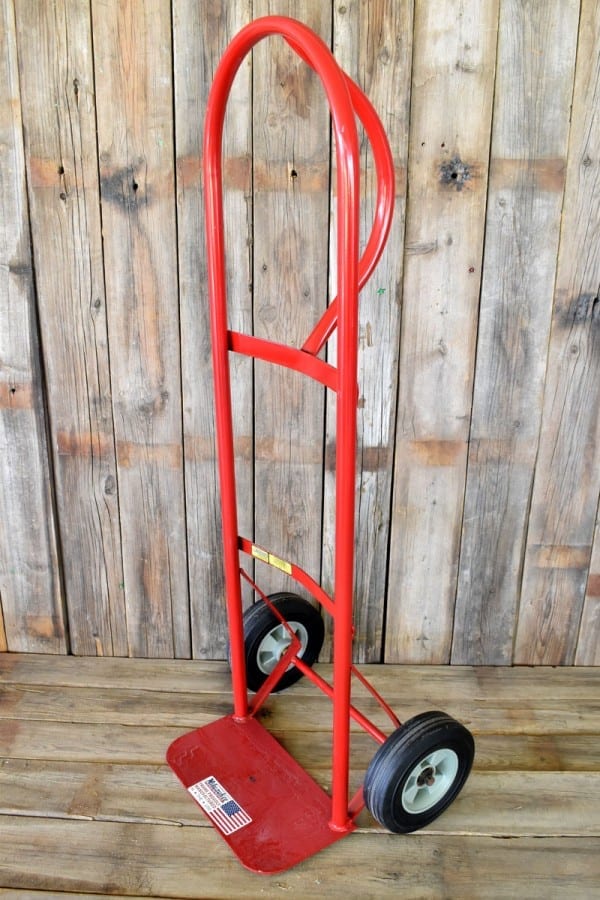
- Dolly or hand trucks (You will need one dolly for each train car) I bought mine at Walmart, but you can also get them HERE. Note: If you are going to be hauling around adults, I suggest a wider wheel base. Usually a dolly with the inflatable rubber wheels are wider based than the hard wheels that don’t need to be aired up (like mine). The wider based wheels will prevent the barrel from tipping while turning with a heavier adult in it.
Hitch:
A set of the following per train car:
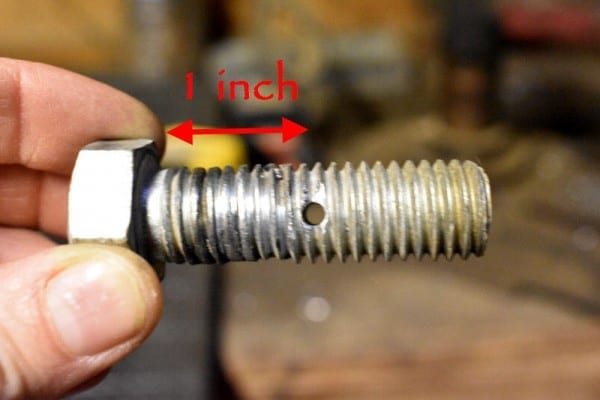
- Eye Bolts – (2). Originally, I used 90lb light duty bolts (5/16in x 3-1/4in long) with an inside eye diameter of 3/4 inch) found HERE. Then, some heavier passengers rode in the train and the eye bolts bent. I then switched the bolts out for heavy duty, galvanized steel eye bolts (3/8 inch x 4-1/4in long, & an inside inner diameter of 3/4 inch) found HERE. They held up well, but they are more expensive. In conclusion, I recommend using the heavier eye bolts, but if you won’t be hauling any heavier passengers, and you only have 3 or less cars, the lighter duty may work fine.
- Nuts (4) – to fit your eye bolts
- Fender Washers (4) – to fit your eye bolts
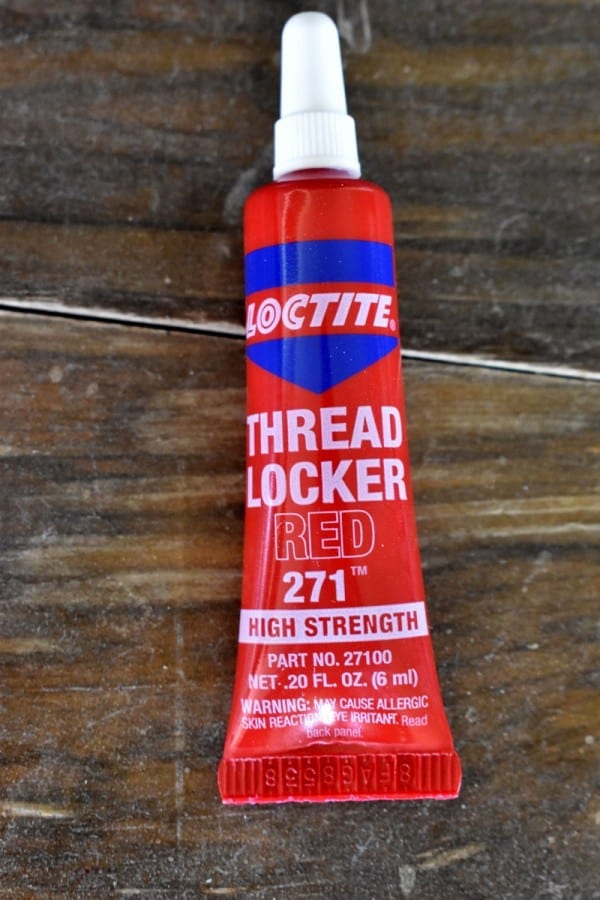
- Loctite Thread Locker – I smeared this on the threads of all of my eye bolts (every place on the screw there would be a nut), to prevent the nuts from unscrewing from the bolts. Found Here.
Attach Body to Dolly:
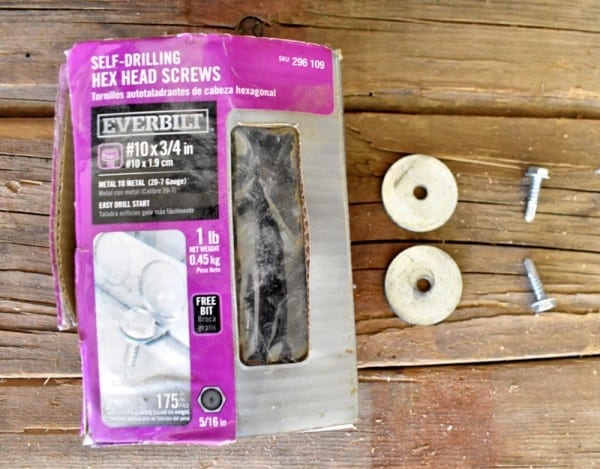
- Self-Drilling Hex Head Screws – (2) #10 x 3/4 inch
- Fender Washers – (2) that fit the Self-drilling Hex Head Screws (to mount barrel onto the dolly). Both Screw and Washers can be purchased at Home Depot or Lowe’s or purchase the screws HERE. (You will need one set of these supplies for every train car you have).
Hitch Lock:
A set of the following to connect two train cars together:
-
- Grade 5 External Hex-Head Cap Screw (1) 5/8 inch x 2 inch, 18 pitch (18 threads per inch) found HERE. I drilled a hole through my bolt with a drill press for the hair pin clip to fit through. If you don’t want to go through the trouble of drilling a hole, you can omit the Hex Head Cap Screw and instead purchase a clevis pin (size 3/4in x 3in) found HERE.
- Hair Pin Clip – (1) 5/32 inch found HERE
- Cut Washers – (2) 5/8 inch found HERE

Note: I changed these light-Duty Eye Bolts for Heavy-Duty Eye Bolts for heavier passengers. See them Here:
Hitch #4 (Loctite Thread Locker for Hitch – (See Supplies)

Tip:
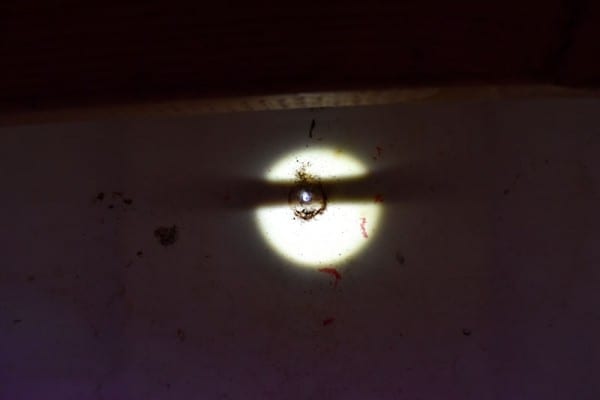
When you’re drilling into the barrel, it helps to have a flashlight on hand. Shine it onto the barrel from the outside and you’ll see the silhouette of the frame on the inside of where to drill.

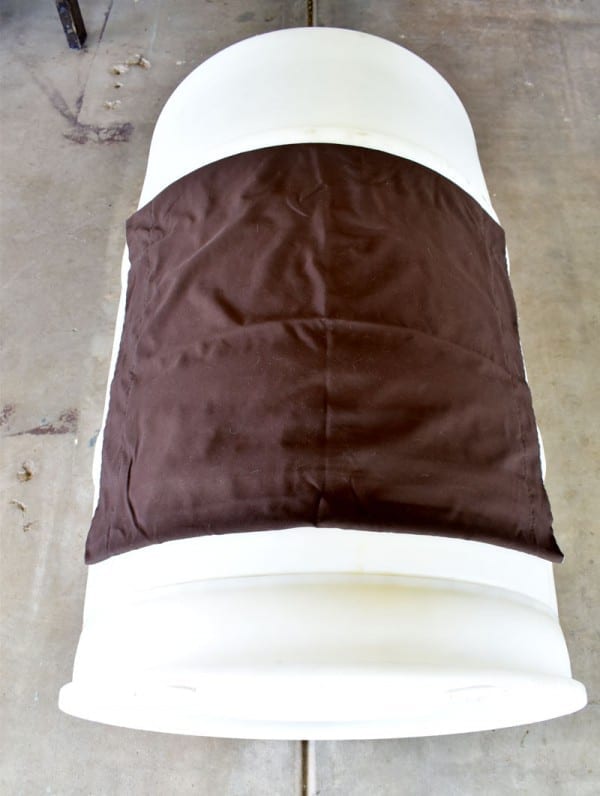
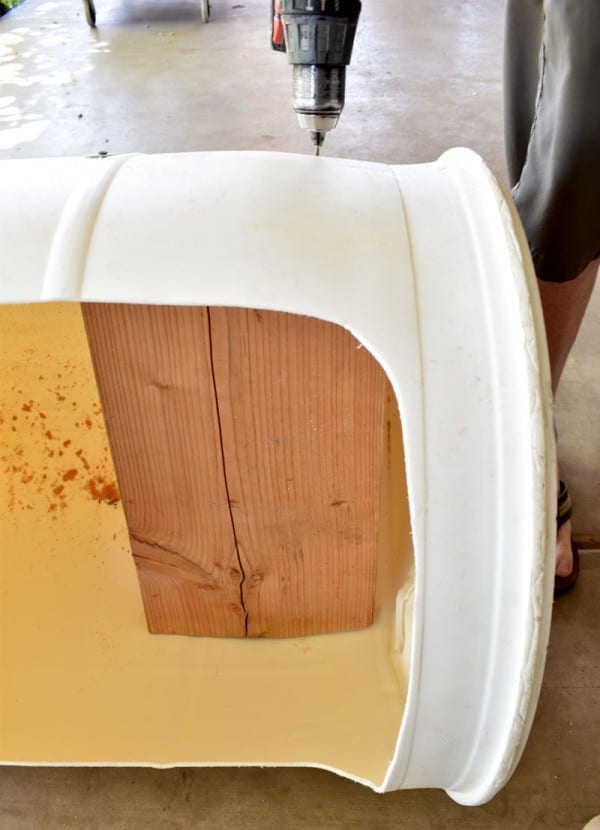
Cutting the Hole:
First, cut a hole out of each of your barrels. I used a pillow case as my pattern and simply traced around it with a pencil, rounding off all the corners instead of keeping them square like the pillowcase).
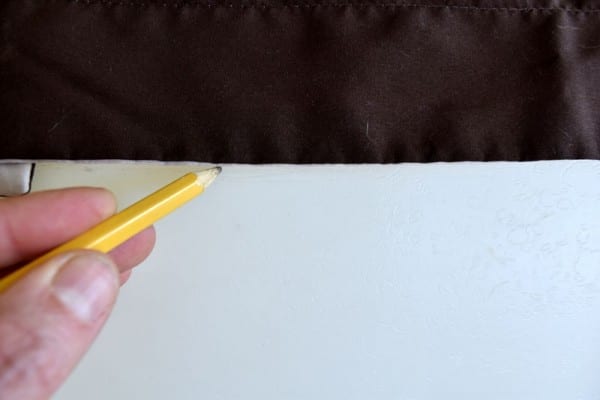
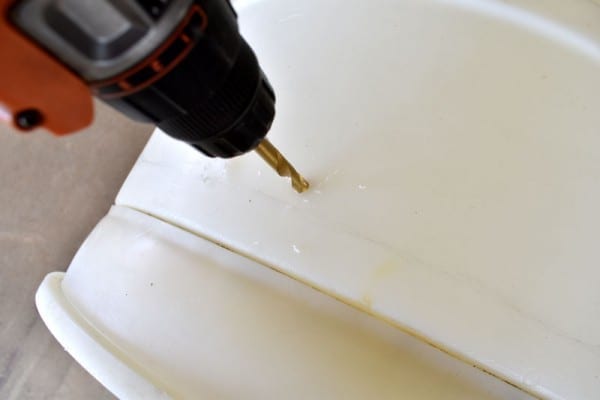
Drill a hole into the barrel large enough to slide your jigsaw blade into. Make sure the hole is on the INSIDE of the line that was drawn (which is the part that will be removed). Next, cut along the pencil line with the jigsaw.
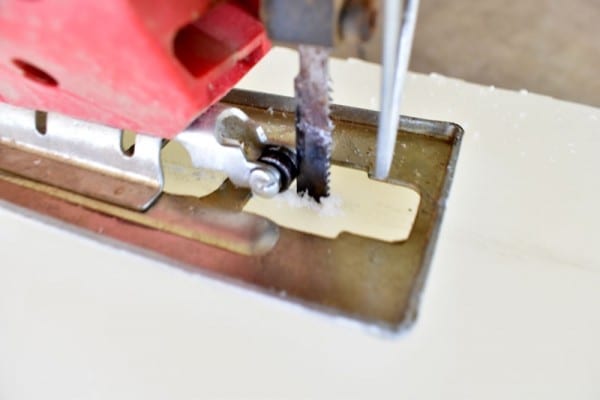
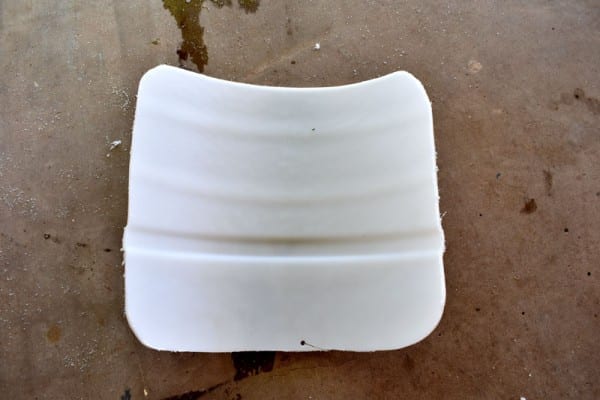
Perfect!
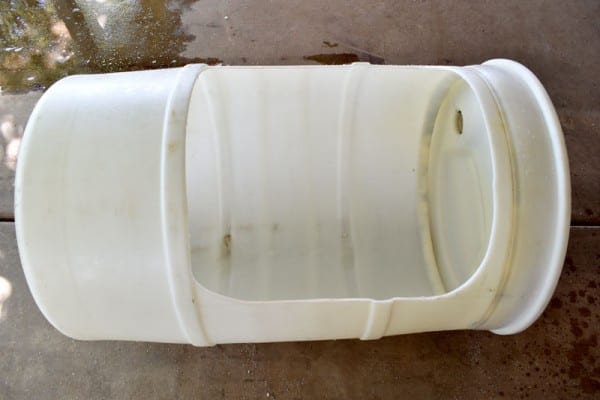
Now, use the plastic piece that you just cut out as your template for all the holes in the other barrels that you’ll be cutting out.
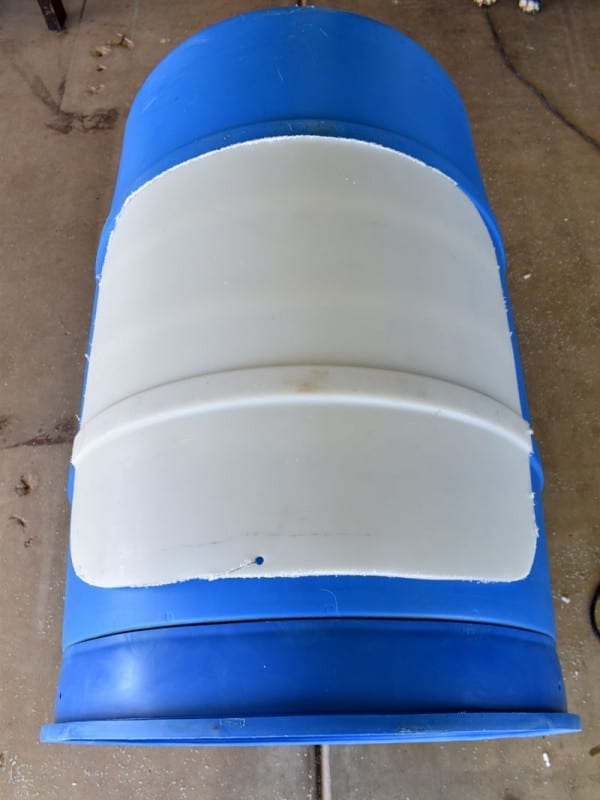
Making and Installing the Seats:
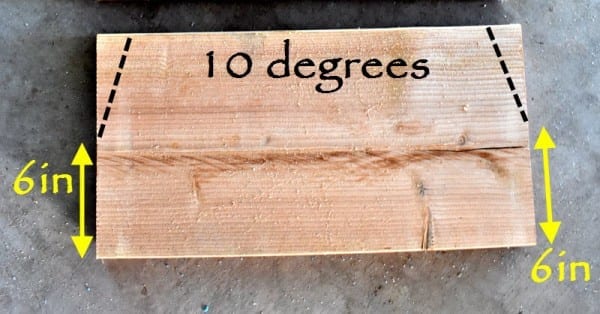
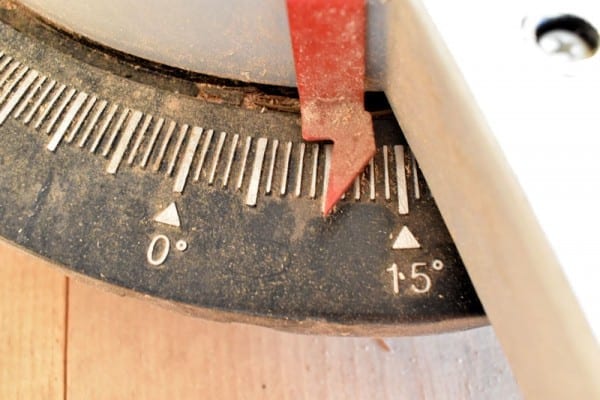
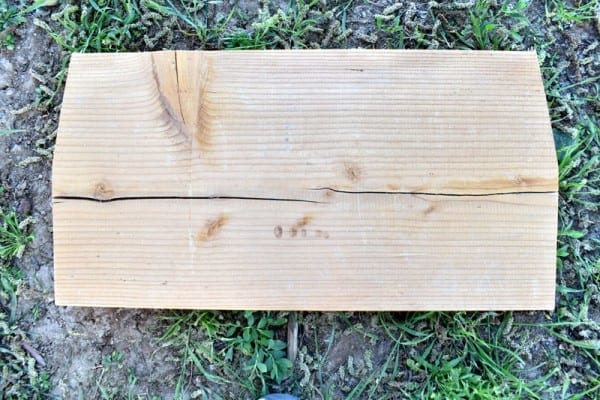
For your wood seats, measure 6 inches up from the bottom, then cut a 10 degree angle off the corners. If you need to sand the wood down so there are no splinters, and/or if you would like to paint or varnish your seats, this is the time to do it.
Next, gather your #5 supplies to mount the seats onto the barrels.
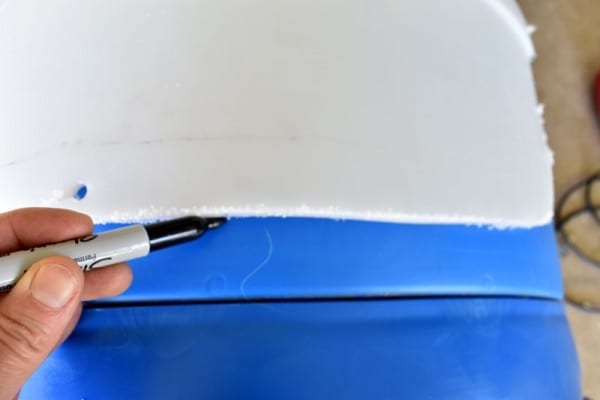
Place the seat inside the barrel where you want it. Next, drill two pilot holes from the outside, through the barrel and into the board (to avoid splitting the wood).
Using the drill and a phillips bit tip, insert the screw through the fender washer. Now, screw the wood screw into each pilot hole (use 2 screws and 2 washers in each end of the seat).

Making a Hitch to Attach Cars:
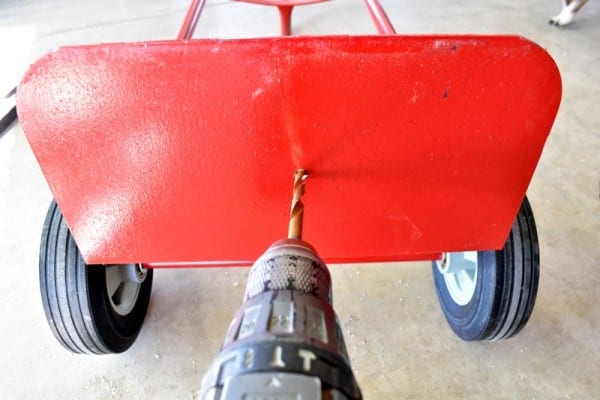
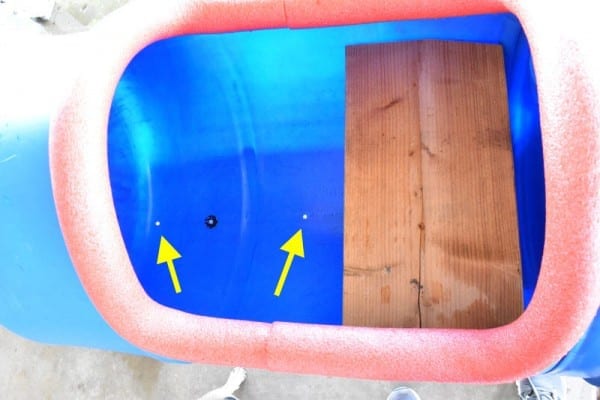
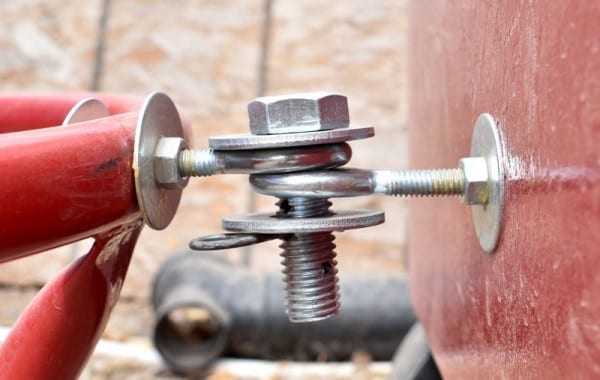
First, drill a hole into the top of the dolly, large enough for the eye bolt to slide in. Make sure the hole is not too loose of a fit (not too large for the eye bolt to rattle around in, but large enough to slide it in).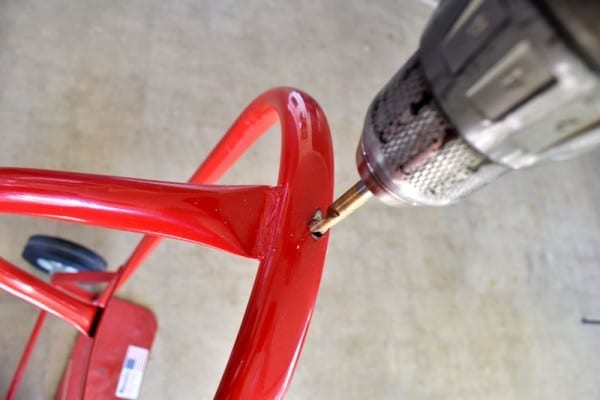
Next, gather your (2) eye bolts, (4) washers and nuts. (See Body #2 in Supplies).
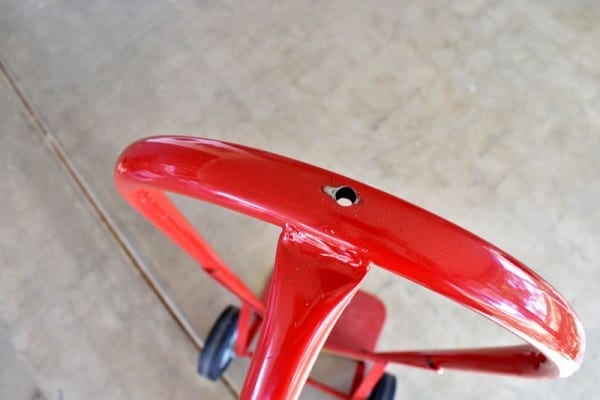
Now, mount onto the dolly as shown.
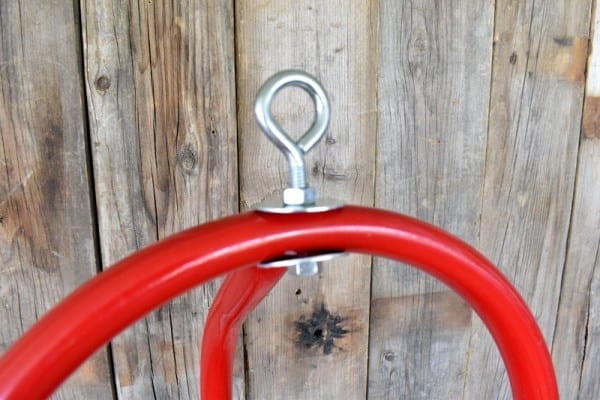
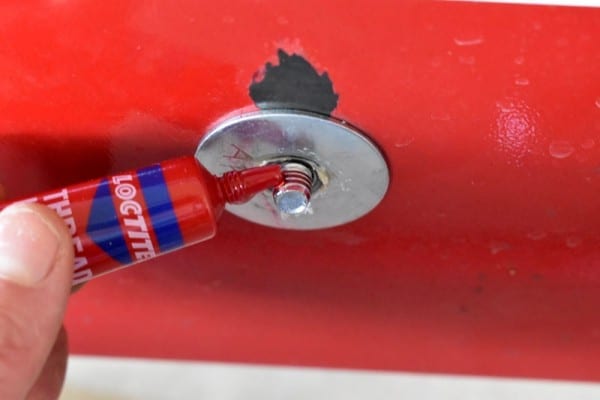
I smeared a little loctite everywhere there was a nut that was screwed to a bolt, to avoid anything from wiggling loose over time.
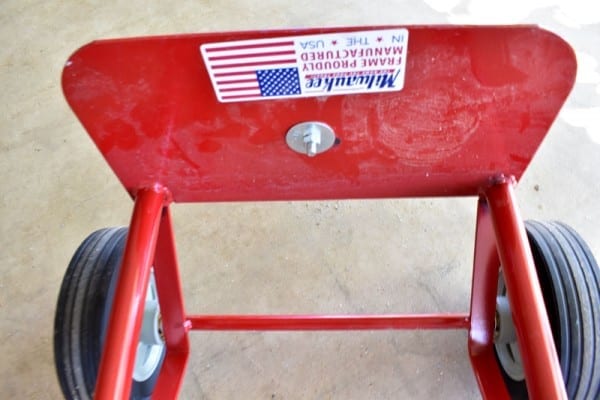
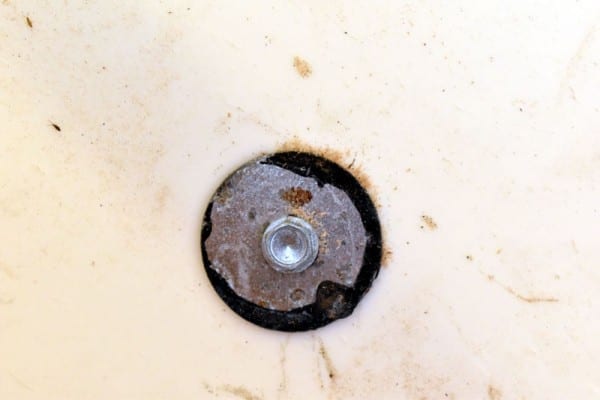
Next, drill a hole in the center of the bottom of the dolly. This is where the other eye bolt will go.
Finally, mount the other eye bolt, washer and nuts to the dolly as shown. Remember to add the loctite!

Mounting the Barrel to the Dolly:
First, gather your self drilling screws and washers (Base – #2 & #3 supplies).
Then, place the barrel onto the dolly and drill two screws through the barrel, into the frame of the dolly. Do this in the front and back of the barrel. (I drilled pilot holes first to make it easier).


Next, I also drilled a few holes in the bottom of the barrel for easy drainage when I hose them off for cleaning.
Locking the Hitch:
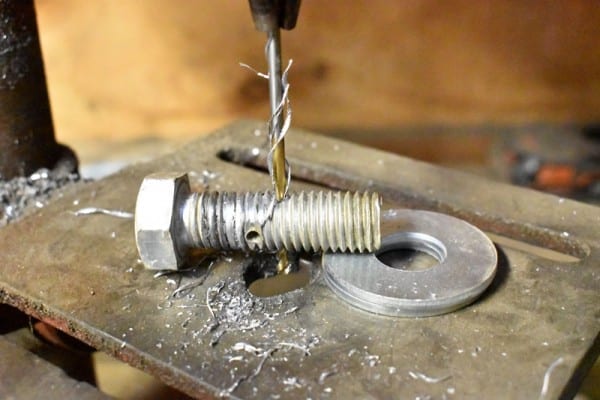
Gather your Grade 5, External, Hex-Head Cap Screw (or clevis pin if you don’t want to drill a hole), one hair pin clip and two cut washers. (Base – # 4 Supplies)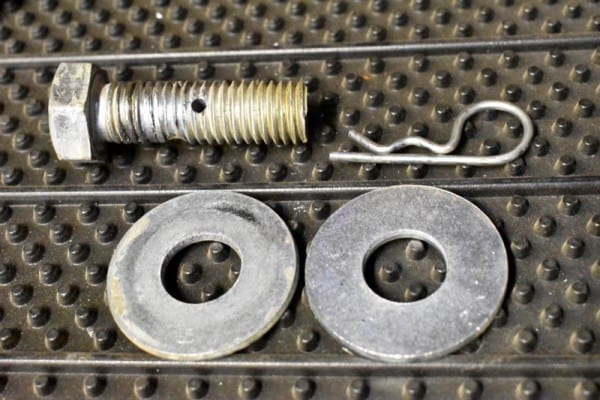
If you haven’t drilled a hole into your bolt, you can do it now (if you choose to use a clevis pin instead, you can skip this part). Using a drill press, I drilled a few holes before deciding that the best placement for my hole was about an inch down (See Picture).
Last, connect your cars as so, with the back car eye bolt on top of the front car eye bolt (doing it this way keeps all the weight on the eye bolt and off of the hair pin clip).
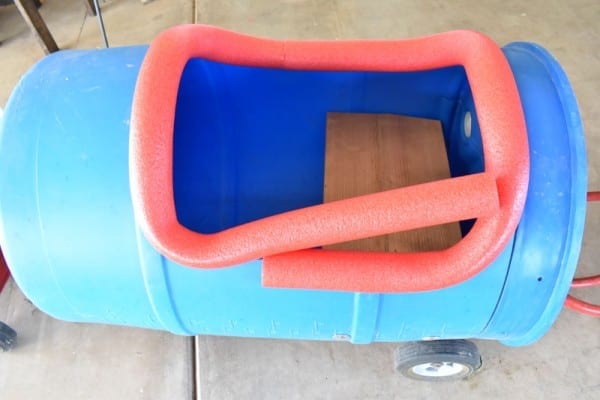
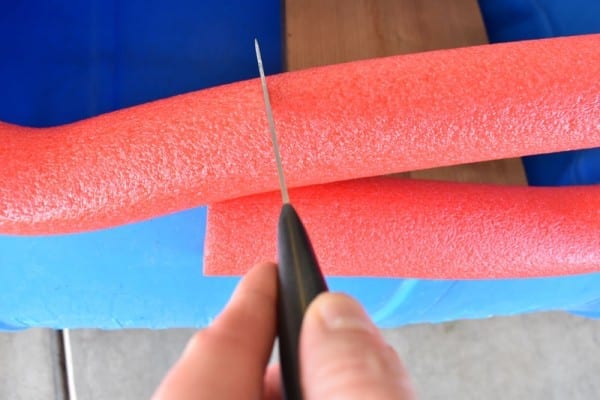
Adding the Padding:
First, gather your pool noodles.
With a knife, slice to the center of the noodle, from end to end.
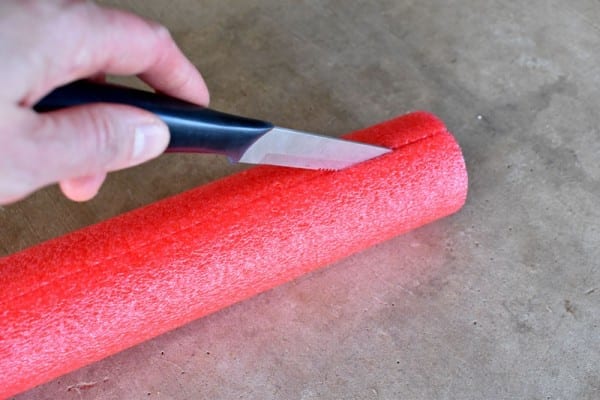
Next, using two noodles per barrel, slide a noodle onto the perimeter edge of the barrel hole, making sure to squish it tightly into all the curves.
Do the same thing for the second noodle. Cut it to the desired length, making sure to leave an extra 2-4 inches. You’ll basically squish it tightly into place because the tighter the fit, the better it’ll hold.

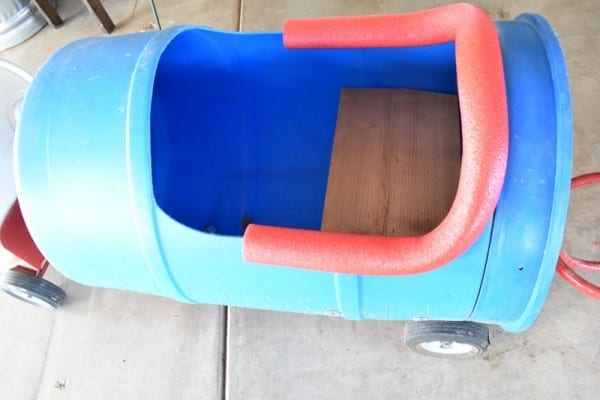
Last, hook it up to the engine of your choice and you’re ready to roll! All aboard!
Have fun and be safe!!
Tee xo
Want to print out this tutorial without the ads?
Click here to download my DIY Easy Barrel Train PDF Printable Tutorial for only $5!
Disclaimer:
Please drive safely and slowly and only allow a responsible adult to drive the train. Watch the children at all time, keep them seated while the train is moving, and do not allow toddlers to ride without an adult. Avoid any terrain that could tip the train, such as sidewalk edges, steep hills, large rocks, etc. I like to drive the kids around the park or on a level grassy area in my large backyard.
Although I have never had any accidents or problems, I do not assume any responsibility for the safety of this train, or by the use of my instructions or supplies listed. If you build it using anything from my site, you must agree to assume all responsibly and accountability for any accident or mishap that could happen.
DIY Easy Barrel Train
Sharing at these great link parties:
The Hearth & Soul Celebrate Your Story You’re the Star Unlimited Monthy Link Party Tutorials & Tips Inspire Me Monday Fabulous Party Inspire Me Monday Wonderful Wednesday Tuesdays at our Home Make it Pretty Monday Farm Fresh Tuesdays Recipe & DIY Linky Project Inspired Inspire Me Tuesday Beautifully Made Creative Muster Party Wow Me Wednesday Talk of Town Party Reader Tip Tuesday Tuesdays with a Twist Wonderful Wednesday Home and Garden Thursday Wednesday AIM Link Party
More great link parties I’m sharing at:
To Grandma’s House We Go Vintage Charm Simple Homestead Blog Hop Waste Not Wednesday Homestead Blog Hop Party in Your PJs Friday at the Fire Station Thursday Favorite Things Keep in Touch Home Matters Party Friday Feature Funtastic Fridays Friday Favorites Family Homesteading/off the Grid Best of the Weekend Flaunt it Friday Handmade Otherwise Happy Pink Saturday Dare to Share Saturday Sparks Create, Bake, Grow & Gather A Morning Cup of Joe! Snickerdoodle Create Bake Make Happiness is Homemade Saturday Shuffle Blog Hop Saturday Sharefest Over the Moon Silver Pennies Sunday Dishing it & Digging it Merry Monday
Vanessa
What a seriously fun project!
Tee
Thank you! It IS fun!
Alice
this is such a neat idea and I’ve never seen something like this before. Thanks for sharing it with us at #OMHGWW and hope to see you again next week.
Tee
Thank you Alice! I’m glad you like it!
Dee | Grammy's Grid
Thanks for linking up at the #WednesdayAIMLinkParty 40! Shared ♥
Tee
Thank you Dee!
Marie
Oh my word, my grandchildren would love this! Such a great idea and I’m so glad you shared it at our Talk Of The Town Party. Pinned 🙂
Tee
Thank you Marie! It is definitely a kid magnet!
mireille
That is adorable! I love it!
http://www.chezmireillefashiontravelmom.com
Mother of 3
How adorable! A local farm has a few of these for driving kids around the fields and my boys loved them when they were little. Thanks so much for sharing with us at the Summer Fun party. Pinned.
Rebecca
That is sooooo stinkin’ CUTE!!!! What a GREAT project! Thanks for sharing!!!
Happy Pink Saturday!
Cottage Blessings,
Rebecca
Cecilia
How fun! Thanks for sharing at Vintage Charm!
T'onna | Sew Crafty Crochet
This looks like so much fun! My kids attended a friend’s birthday party at a local farm, and they really enjoyed the tractor ride, and it looked similar to this. Thanks so much for sharing at the Snickerdoodle Create Bake Make Link Party!
Tee
It is a LOT of fun, T’onna! Thank you!
Natasha Mairs
wow this is such a cool idea!! Love that you added pool noodles around the sides. My kids would love one of these
Tee
Thank you Natasha! The kids love this train!! It is so much fun!
Ariadna
Hi I loved it. But I have a question? how do you attach it to your land mower ? Thanks
Tee
Hi Adriana,
There should be a hole in the back of the mower that you can slide a bolt through to attach the train. Hope that helps!
Margy
So cute. Our farmer’s market has a miniature train that gives rides to kids and their parents (if they want to go). It is very popular and is run by a friend of ours who is a train fanatic. – Margy
Tee
That sounds like fun! Trains are always a kid magnet! Thanks for visiting!
ann
We can’t wait to make this, THANK YOU!! What size are the barrels?
Tee
Hi Ann!
They are 50 gallon barrels. You’ll have to post pics when you’re done building your train!
Sue
My husband and I worked on making this one Saturday with our grandsons, Kayden and Dawson. They had such fun helping. Then we drove them around. We need to make 2 more cars for the train, and finish the other two, then we will be ready for fun at church functions! Thanks for the info.
Tee
Hi Sue,
That sounds like it was a fun weekend!…and you’ll be the hit at your church’s functions!. Glad you enjoyed the tutorial 🙂