
DIY Cooling Misting System-Video
DIY Cooling Misting System
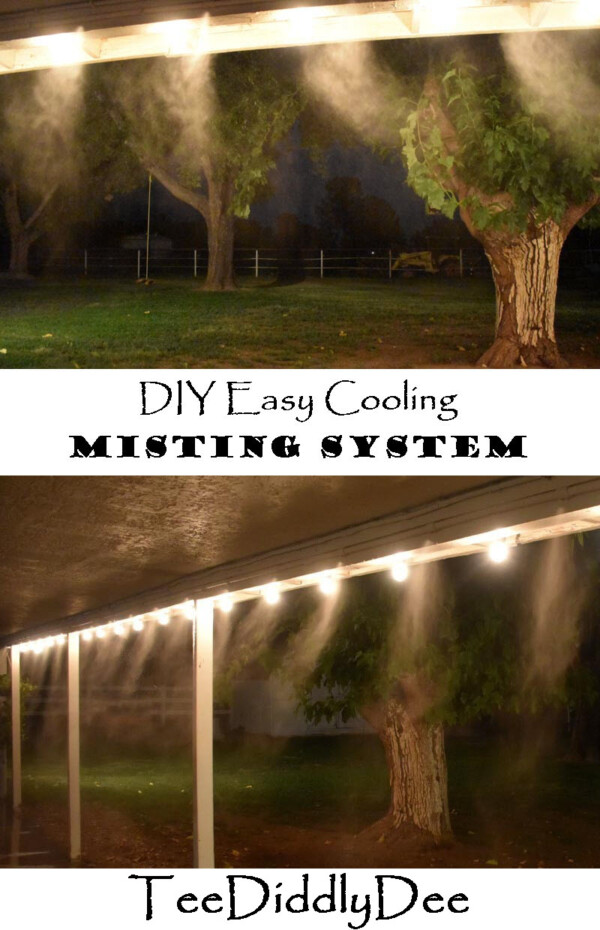
I am so excited to show you my new DIY Cooling Misting System for my patio mister, as it’s perfect for summer entertaining or just lounging out on the porch! This simple mister system has made such a difference in reducing the heat, and it was very easy to set it all up. Where I live, summers can be brutal. Temperatures in Arizona can range from 110 to 122 degrees although it is usually a very dry heat. Installing misters on your patio is, by far, the best way to enjoy spending time outside in the summer! My patio used to be miserably hot and uncomfortable to spend any amount of time outside. Now, I can entertain all summer and everyone stays comfortable!
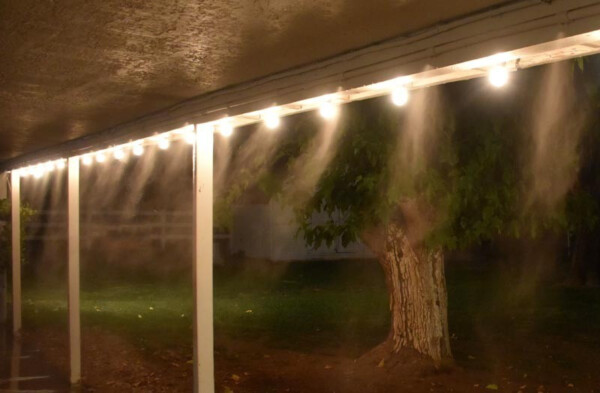
These misters actually spray a fog-like mist. It is so refreshing and cool!

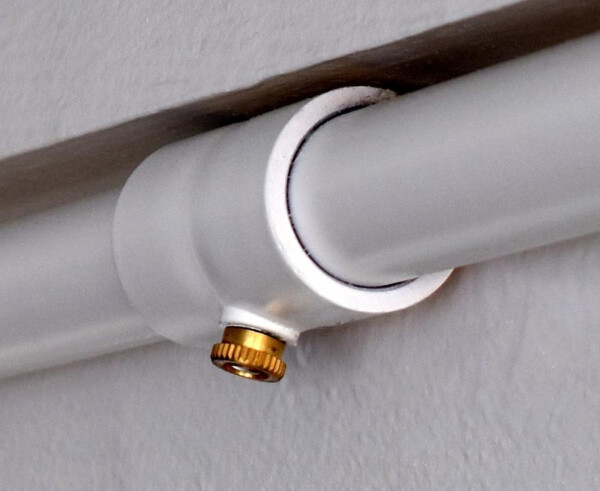
Here, you can see what each of these tiny misters look like.
I installed our mister system (while my husband was away on a trip) along the top of my patio ceiling, against the outside patio beam, alongside my Hanging Plant Drip System. Mr. Teediddlydee was pretty happy with it all when he returned!
If you would like to install one like mine, check out my tutorial below! Believe me!! You will be glad you did!
DIY Cooling Misting System Tutorial
Tools:
- Mitre Saw or PVC Cutter
Supplies:
PVC Supplies:
(All PVC is 1/2 inch diameter)
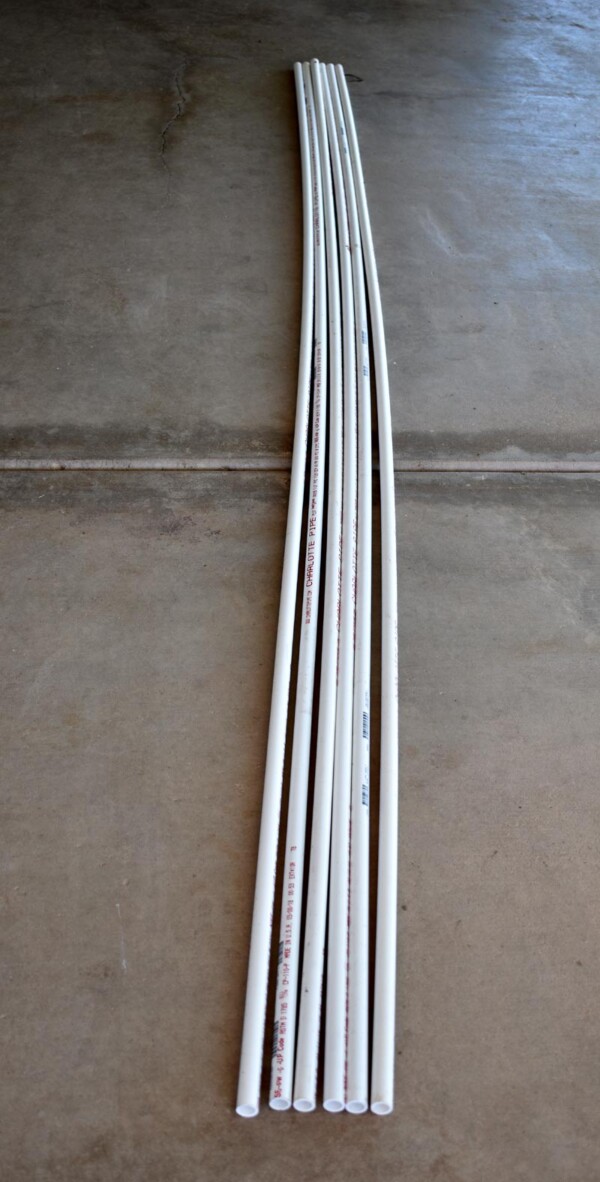
- Pipe (1/2in PVC) Measure the distance you want your PVC pipe to run, starting from your hose nozzle, up the wall, and along where your misters will run. When you reach where you want the misters to start, measure the distance you want your misters to run and divide that number by 2. This number will be how many 2ft pieces of PVC you’ll need.
- Couplings (1/2in PVC) with Brass Mister Nozzles
- Extra Brass Mister Nozzles (It’s nice to have a few extra just in case, AND you’ll need replacements a few months down the line if you have hard water and they start to clog.)
- PVC Hose Adapter (1/2 PVC) – compatible with 1/2 PVC pipe.
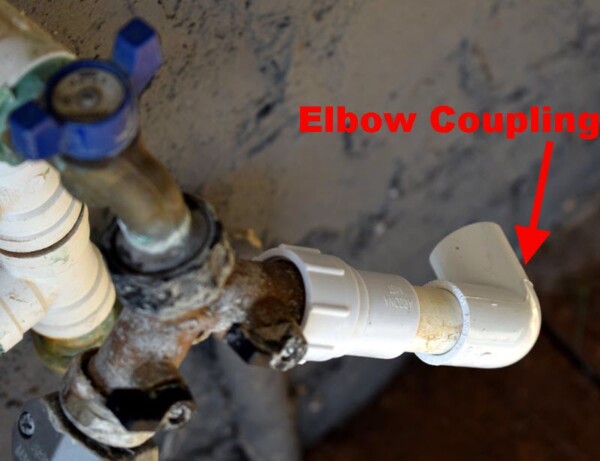
- Elbow Coupling (1/2in PVC) – Any time you make a 90 degree turn, you will need one of these.
- Tee Coupling (1/2in PVC) – This coupling is used to make two 90 degree turns into two opposite directions.
- Coupling (1/2 inch PVC) – Used to mend two pieces of 1/2 inch PVC pipe together. It’s nice to have a few of these around in case you accidentally cut the PVC pipe in the wrong place, and need to mend it back together.
- End Cap (1/2in PVC)
Extra Supplies:
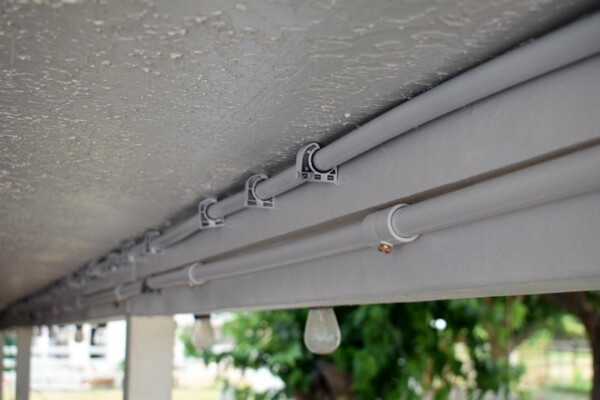
- Galvanized Steel Tube Strap (1/2in)or 3/4in pick up talon (for hanging the PVC pipe). I used both but you can decide what works best for you.
- Drywall Screws (1 1/4 inch long) to attach the tube straps.
- PVC Primer and Cement
- Two-Way “Y” Water Hose Connector (optional)-I used one so that I could still have access to my water faucet (like a hose).
- Teflon Tape – although I didn’t need it, you may need to wrap a little teflon tape around your water faucet before attaching your PVC Hose Adapter, to make sure it will seal well.
Pictures of Supplies:
1. Pipe (1/2in PVC) – Measure the distance you want your PVC pipe to run, starting from your hose nozzle, up the wall, and along where your misters will run. When you reach where you want the misters to start, measure the distance you want your misters to run and divide that number by 2. This number will be how many 2ft pieces of PVC you’ll need.
2. Couplings (1/2in PVC) with Brass Mister Nozzles

3. Extra Brass Mister Nozzles (It’s nice to have a few extra just in case, AND you’ll need replacements a few months down the line if you have hard water and they start to clog.)

4. PVC Hose Adapter – Compatable with 1/2 PVC Pipe

5. Elbow Coupling (1/2in PVC) – Any time you make a 90 degree turn, you will need one of these.

6. Tee Coupling (1/2in PVC) – This coupling is used to make two 90 degree turns into two opposite directions.

7. Coupling (1/2 inch PVC) – Used to mend two pieces of 1/2 inch PVC pipe together. It’s nice to have a few of these around in case you accidentally cut the PVC pipe in the wrong place, and need to mend it back together


Extra Supplies:
1. 1/2in Tube strap or 3/4in pick up talon (for hanging the PVC pipe). I used both but you can decide what works best for you. I used 1 1/4 inch long drywall screws to attach the tube straps.


11. Mitre Saw (fastest) or PVC cutter

12. Two-way “Y” Water Hose Connector (optional)- I used one so that I could still have access to my water faucet (like a hose).

DIY Cooling Misting System – Instructions:
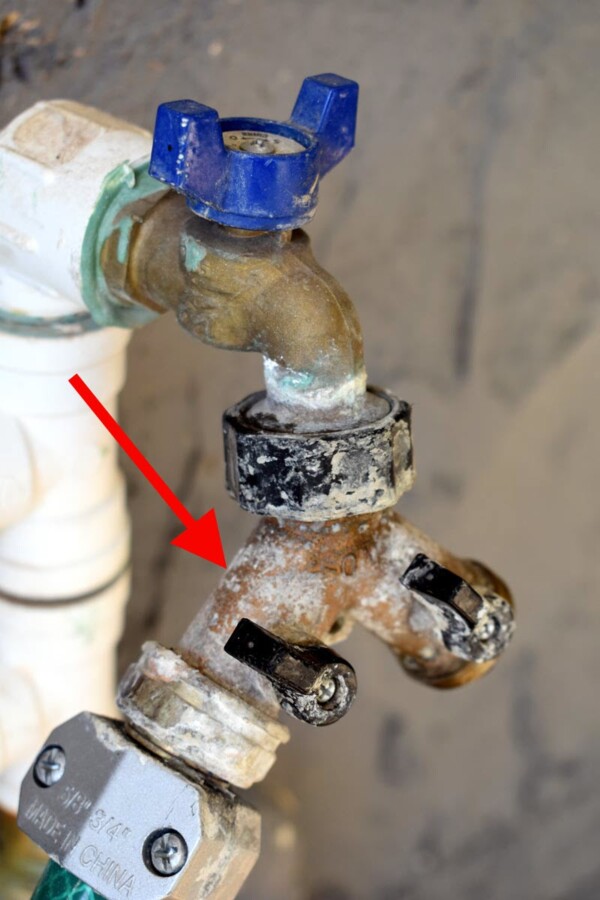
Adding 2-Way Connector to faucet valve:
First, gather your 2-way, ‘Y” Water Hose Connector.
Next screw this 2-way, Y water hose connector onto your outside faucet valve as shown below.
Note: I had been using this Two-Way “Y” Water Hose Connector for quite some time, which is why mine looks a bit decrepit from our hard water. It still works just fine, so I don’t fix what doesn’t need fixing…(no judging!) Yours will look new. 🙂
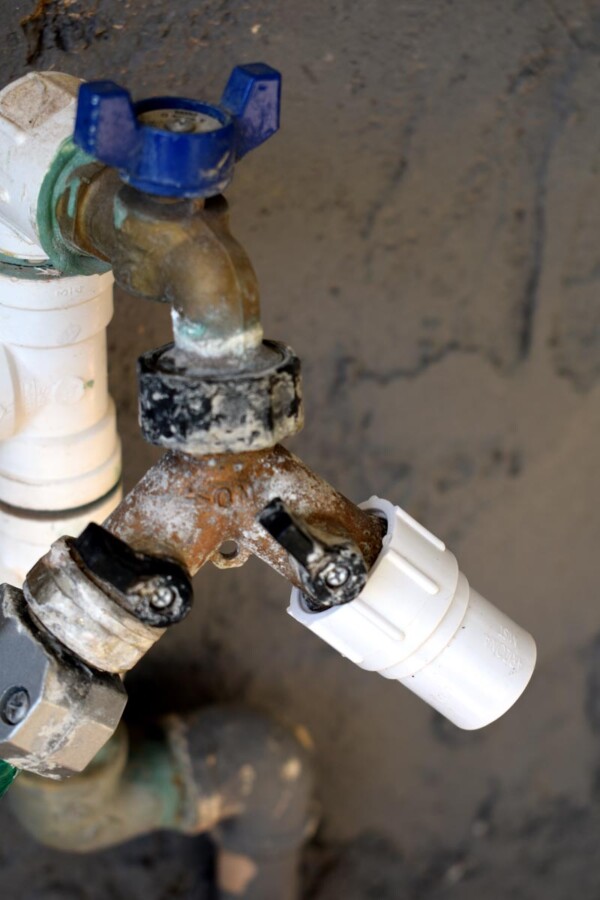
Adding PVC Pipe to Two-Way “Y” Water Hose Connector:
First, screw on the PVC Hose Adapter-compatable with 1/2 PVC pipe. Wrap Teflon Tape a couple of times around the threads of your two-way “Y” connector before attaching this, to make sure it will seal well. (Not shown).
Converting to PVC Connections:
Since I needed to make a sharp turn backwards to go up the wall with the PVC, I cut a small piece of 1/2 inch PVC pipe (about 2-3 inches long) and, using primer and cement, glued it to the PVC Hose Adapter. I did this so I could glue on an elbow coupling.
Adding PVC Pipe to fit your path:
Next, I primed, then glued on an elbow coupling so the open end faced the wall, as shown below.
For the next step, I cut, primed, and glued another piece of PVC pipe that would reach the wall. You’ll see (in the next couple of pics) I actually cut this piece a bit shorter than shown so that it fit better.

Here, I primed and glued on another elbow.

Next, I ran a long piece of PVC all the way up the wall to the ceiling and attached it by priming and gluing it to the elbow.

Here, I made a mistake and cut the pipe too short. In order to make it longer, I added another short length of PVC pipe, by gluing on a 1/2 inch coupling. (I always make sure I have a few of these laying around just in case!). The purple color is from the primer which dripped down. Later, I am going to paint all of this to match the wall and ceiling colors so it blends well.

Running PVC along Ceiling:
Continue running the PVC line along the ceiling, and securing them to the ceiling with . In order to secure it to the drywall ceiling, I screwed a 1/2 inch tube strap over the pipe using a couple of 1 1/4 inch drywall screws.

Measuring, cutting and gluing the mister system PVC piping:
Here, I continued gluing elbows and pipe together (securing them to the wall with metal tube straps, as needed), until I reached the patio beam where I wanted my misters to run.
For this step, I measured the distance where I wanted the mister nozzles to start and end.

Showing mister system running along ceiling beams.
Now divide the distance number by two. The ending number will be how many 2ft pieces of PVC you’ll need to cut. (This will enable the mister nozzles to be 2 feet part from each other).

To speed up my work, I did the following:
First, gather half of the number of PVC pipe you just cut and prime both ends.
Next, gather you couplings that have the holes in them for the brass mister nozzles to fit into. You will also need two couplings with the holes for the for pipe. Prime the inside of both ends of the 1/2in PVC coupling with brass mister nozzles.

Now, glue the couplings onto both ends of the PVC pipe, making sure the holes are all facing the same direction on both ends.

Finally, primer, glue, and connect the PVC pieces (with the couplings attached) with the other half of the PVC pieces that are left.
I couldn’t find my picture of this, but I laid them out along the floor below where they were to be installed while I glued them together.

You should have one long line of PVC pipe with 2 foot-spaced misters couplings now on the floor. This part goes faster with 2 people, but I did it by myself and it was not too bad.
Next, fit one end of the long assembly of pipe and misters, into the remaing open coupling on the ceiling, then prime and glue.

Connecting the Pipe to the ceiling:
I used 3/4in Pick-Up Talons to mount the pipe (add one talon, skip 2 misters, then add another talon, skip 2 misters, and so forth) to the wood framing part of the patio. The Pick-up Talons come with nails to secure them and they held my 1/2 in pipe snugly to the beam.

Now, prime and glue on a 1/2 inch PVC end cap to the very last PVC pipe.

Last, I secured the end with a 3/4in pick up talon.

Adding the Brass Mister Nozzles if Needed:
If the Brass Mister Nozzles are not already on your couplings, you will need to screw them in place. I replace these every month or bi-monthly because they eventually clog from of our very hard water (but the brass mister nozzles replacements are so cheap, it’s worth it).

Paint the Pipe Assembly:
Also, I painted my piping to match the ceiling and wood trim, which gave it a clean, sharp look.
Note: If you do this, be sure to remove the brass mister nozzles before painting, so they won’t get clogged. Or better yet, don’t screw the mister nozzles in until you are finished painting the pipe assembly.
Now turn on your water faucet and enjoy those cool misters! No more miserable, hot summer days spent under the patio!
If you enjoyed this tutorial, please leave a comment at the bottom! I LOVE to hear from you!
Mary-Dee Rickards
Absolutely love it! Your pictures and instructions were very thorough.
Thank you!
Tee
Hi Mary,
Glad you enjoyed the tutorial! I know I love my new patio mister system, and my horses love theirs as well, as I set one up for them in the barn. Makes a huge difference when spending time outside!
Sue
Thankfully, we don’t get your kind of temperatures in the UK (have to say I’m mighty glad about that!!), but your instructions are so very clear, I’m sure they will come in handy for a project at some point! Thank you. Sue
Tee
Hi Sue,
Yep, it gets pretty hot here but the misters definitely make a difference! I’m glad you enjoyed the tutorial and thanks for stopping by!!!