
DIY Flying Crank Ghost-Video
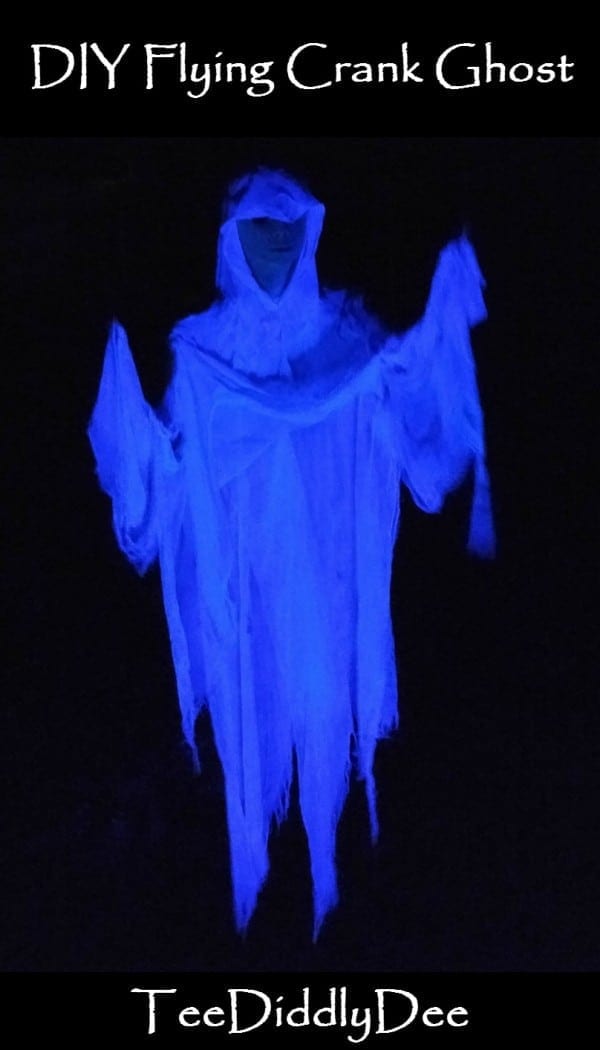
DIY Flying Crank Ghost
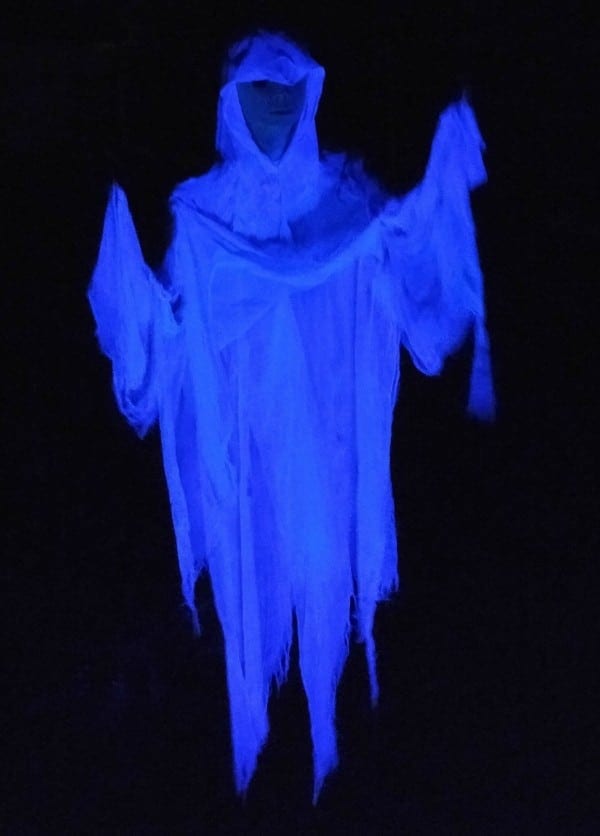
It’s almost Halloween and I’m going to share with you one of my MOST POPULAR props that I put on display this time of year! My brother and I made this flying crank ghost (or FCG) 25 years ago and to this day it STILL stops trick-or-treaters in their tracks! It’s not unusual to have a group of onlookers just stand and stare while they OOOHHH and AHHHH as the life-sized spirit floats up and down. Definitely a sight to see!


How it all works:
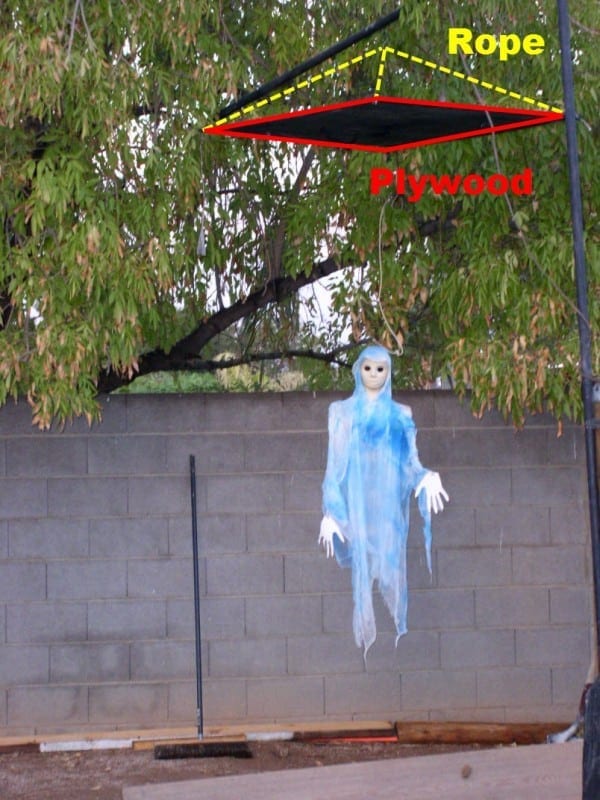
This is how everything looks when it’s mounted and ready to use. I used a plywood platform because it was cheaper than making an aluminum frame. Although you could attach eyebolts to hang the plywood with the rope, I simply just hung the plywood platform by drilling 4 holes in each corner of the wood, threaded each end of the rope through the holes, then tied a large knot in each end so the ropes wouldn’t slide back through the holes in the wood.
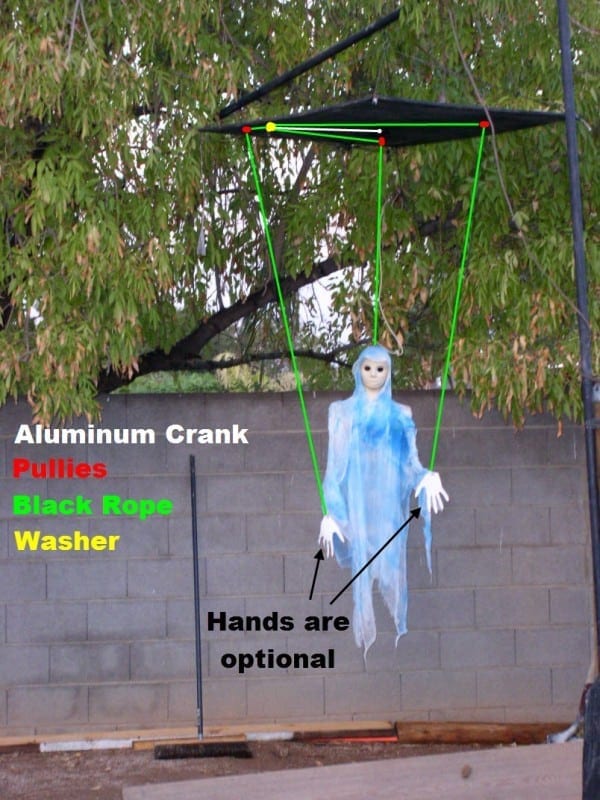
This is how everything is hooked up to move the spirit marionette. As the aluminum crank turns around, the washer at the end of the aluminum crank spins. The three black ropes that are attached to the washer move with it, slide through the pulleys which in turn moves the ghost marionette head and arms up and down. I have found that it’s best to use black rope with a pulley to hang the head but for the arms, substituting fishing line instead of rope looks best. Replacing the arm pulleys with eyebolts and then running the arm fishing line through them are also a preference of mine. You can decide what works best for you. (When I first made this project, I added hands made out of poster board that I had traced from my own hands, but later decided that it looked more realistic without them)
DIY Flying Crank Ghost-Tutorial
Tools:
- Hand drill & bits
- Wood Saw (for cutting plywood into a 4ft x 4ft platform)
- One 2in hole saw (to drill a hole into the center of the plywood)
- Scissors (for cutting rope/fishing line, and cheesecloth)
- One 1/2in Socket & Ratchet
- Pliers (for bending Aluminum strap that will be the crank)
- Vice (not mandatory but useful for bending the metal strap that will serve as the aluminum crank)
- Wire cutters (for cutting wire to attach ropes to holes in spinning washer)
- Grinder or metal cutter (for cutting rotisserie spit to the length of about 2-3 inches)
Supplies to make Spirit Marionette:
- 1 can of florescent blue spray paint. You will spray your cheesecloth on your marionette blue which will glow awesome in the blacklight! (There is another way to ‘blue’ your ghost by soaking your cheesecloth in detergent for a few minutes, rinse it thoroughly, then throw it in the dryer… but I have yet to try this)
- 10 yards of white cheesecloth
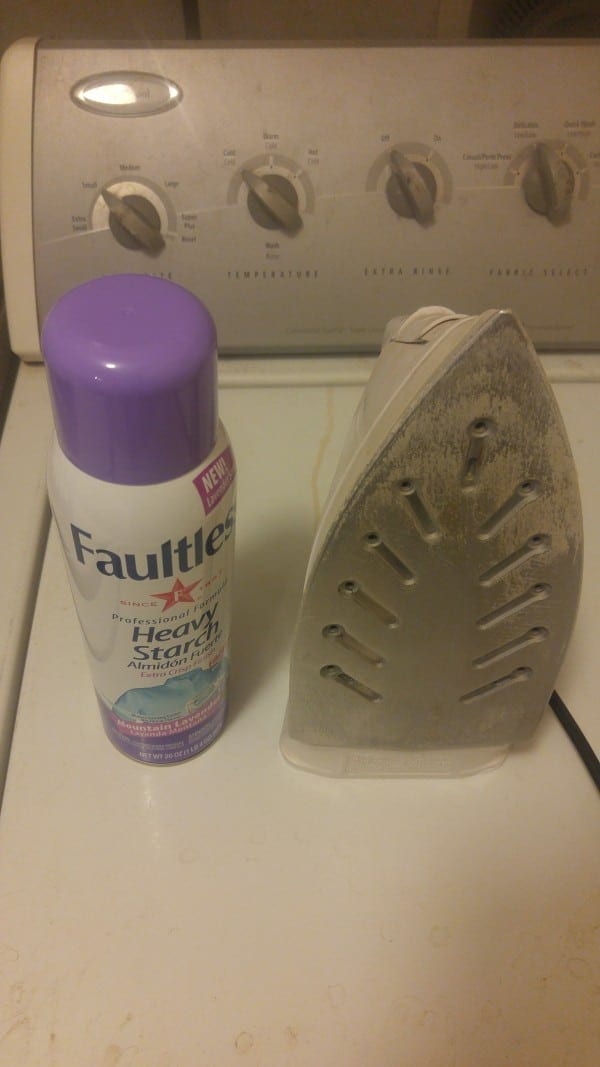
- Iron and starch (you will need to starch and iron your cheesecloth to give it some body)
- 1 styrofoam head/wig stand (you can get these at a wig store or at Joanne’s craft stores)
- 5 or 6 wire coat hangers to build the body (if you don’t have wire clothes hangers, I’ve seen some marionettes made out of wooden dowels connected with hooks bent into eyebolts)
- 1 bottle of clear tacky glue or anything else that dries clear (we will be gluing the cheesecloth to the arms and styrofoam head
Note: Lots of people like to add LED lights for the eyes to their marionette ghosts but I have chosen not to use them. I prefer a more eerie, faceless look.
Supplies for Everything else:
- 100ft of 1/4in diameter black rope-I used the rope to hang the plywood with, but also used it to hang the ghost’s head and arms by spray painting the rope black-it’s invisible to the blacklight (later on I substituted the rope that hung the arms for fishing line instead, so I needed less rope in this case)
- Green fishing line or anything that does not glow or shine in a blacklight (I have found that if you spray paint regular fishing line black it will be just as invisible in the blacklight
- 3 paperclips or a few inches of wire to attach head rope to spinning washer (if you use fishing line to hang the arms you will not need 2 of these)
- One 4ft x4ft 3/4in thick plywood-this will be the platform that hangs the whole contraption
- 1 can of Flat Black Spray Paint-paint the plywood and the rope that hangs and moves the ghost head and arms
- 1 Extension cord (to power your ghost)
- JB Weld or some kind of very strong glue to glue the spit into the Rotisserie motor
- Three or Four 1 1/4in long wood screws to mount rotisserie motor to plywood platform
- One 1/4in diameter rope U-bolt that is at least 1 1/2in long with nuts (Make sure it fits around the spit that spins on the rotisserie motor)
- One large washer that will fit a 1/2in diameter bolt through the middle of it
- One 1/2in diameter bolt-about 2-3in long
- Three nuts that fit 1/2in diameter bolt
- Three pulleys that fit a 1/4in diameter rope (two of these can be substituted for eyebolts if you decide to use fishing line instead of rope to hang the puppet arms)
- Three hooks to hang the pulleys (if you use eyebolts and fishing line to hang the arms you won’t need 2 of these)
- One 1ft long, 1/8in thick aluminum strap-this will be the crank that moves everything-I’ve used both 1in and 2in wide straps and they both have worked well (you can get this at Home Depot or Lowes)
- One rotisserie motor with a 3in spit glued into the shaft hole. Also, some motors don’t come with an outlet attachment and you have to wire the plug attachment on yourself. To make it easy, get one that already has an outlet attachment.
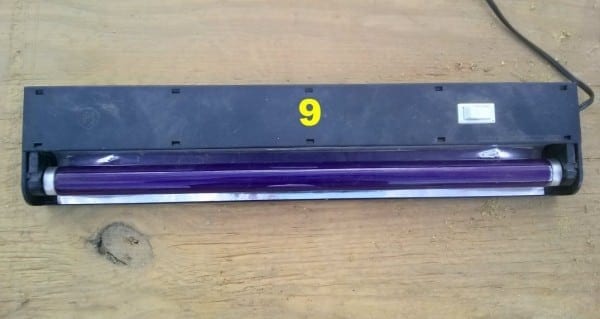
- One florescent blacklight (do not use regular round blacklight bulbs as they do not work very well)
Note: I built my hanging platform out of plywood because it was the cheapest and simplest way to go, and it’s lasted me for 10 years plus. If you are wanting a lighter aluminum platform to hang your ghost you can find some great directions HERE


Constructing the Spirit Marionette
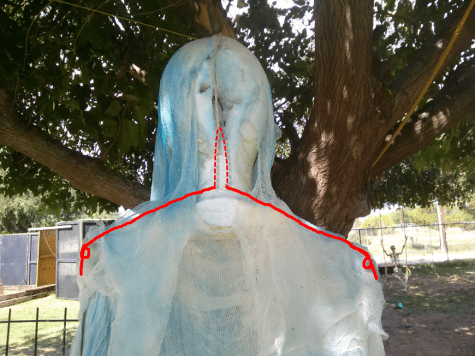
Unbend a wire coat hanger and shape it as shown. I used the length of my own shoulder blades to determine how long to make my marionette’s. I hollowed out my styrofoam head through the bottom of the neck so that the top loop of the shoulder blades could fit inside the neck and into part of the head. On the ends of the coat hanger, I bent two loops with some wire to spare.
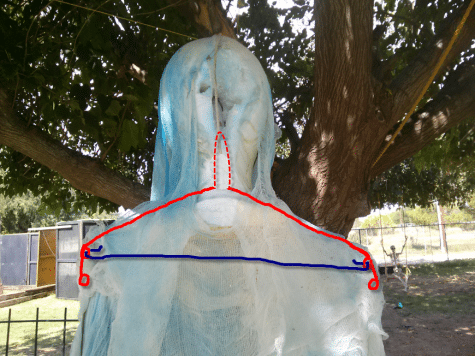
Now bend two more loops on the ends and cut off the excess wire

Attach a second piece of wire by hooking it onto the first two loops that were made
With a third piece of wire make a hook, and hook it onto the top part of the shoulder piece. Push the hook up through the head to the top
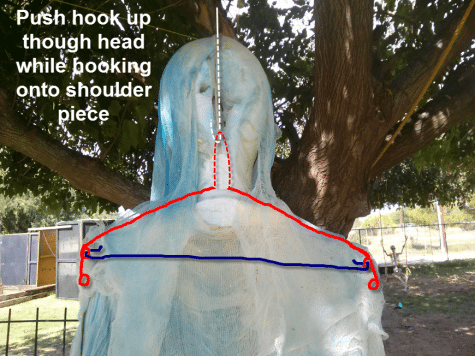
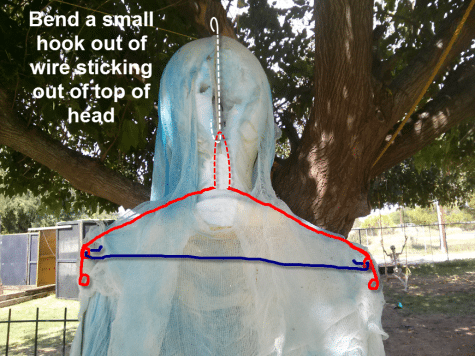
Now make another hook out of the wire sticking through the top of the head. This is how you will hang your ghost
Make and attach the arms by bending two loops at each end of the arm wires. I used my arm length to determine the length of my marionette’s arms.

Draping the Cheesecloth onto Marionette
If you have chosen to ‘blue’ your cheesecloth with fabric detergent, do so now. If you choose to spray paint it with fluorescent blue paint (like I did), you will wait till the very end to ‘blue’ your spirit.
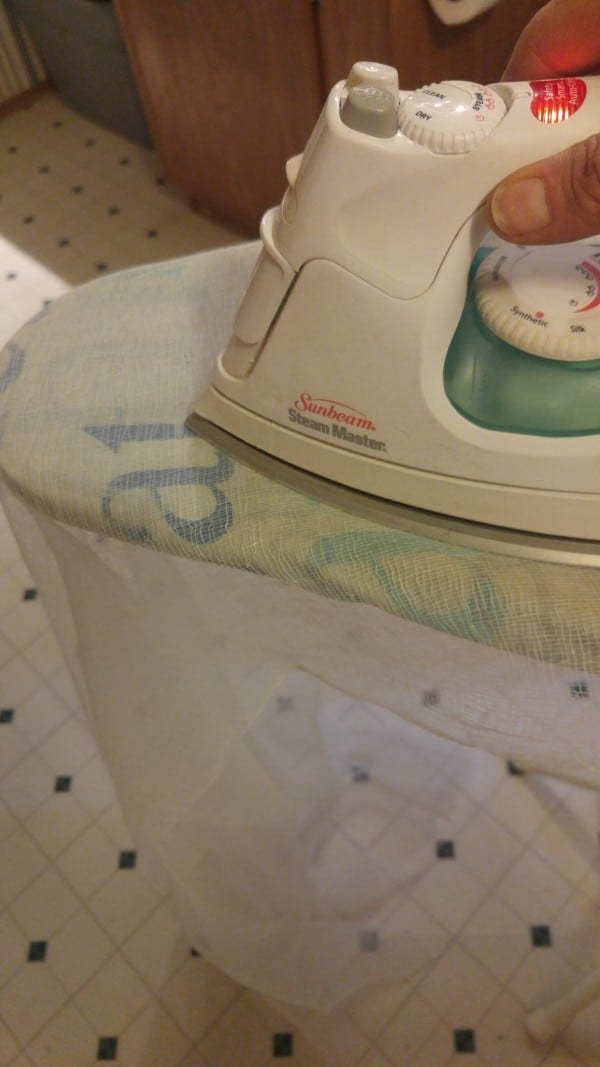
First starch and iron your cheesecloth.
Cut out a large rectangular shaped piece of and drape over the shoulders to cover the coat hangers. Make sure to add some clear tacky glue here and there, to secure the cloth

Add a smaller rectangular piece to the arm and drape over the shoulder. Remember to glue here and there as you go!

Do the same with the other arm

Drape a hood over the head

NOTE: As I had mentioned, some people add LED lights to the eyes and then drape a piece of cheesecloth over the face to form a blue ‘veil’ which the LED eyes shine through. I didn’t do this and just left my Styrofoam head alone which gives it more of a ‘faceless’ look.
If you haven’t yet ‘blued’ your spirit, now is the time to do it! Remember, anything you spray blue will glow so be careful with the face if you decide to have the ‘faceless’ look! OH, an it’s easier to spray paint the cheesecloth with the blacklight on…I love doing this part! 😉
Hanging Platform Assembly:
Here is a closer look at my rotisserie motor. I simply cut a spit at 3in long and JB welded it into the shaft hole. Some motors already come with a motor shaft that sticks out about 1in. This length is NOT long enough so you will need to unscrew it and replace it with a longer spit that you can cut to about 3in long. Remember to glue the spit into the hole with JB weld

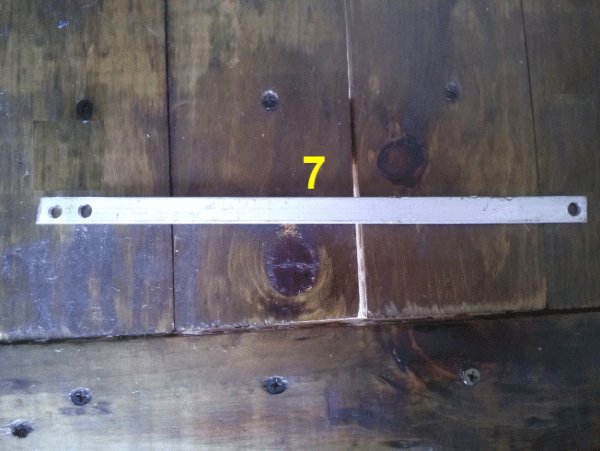
Take your 1ft piece of aluminum strap (7) and drill holes on each end for the U-bolt (1) and regular bolt (3) to slide into
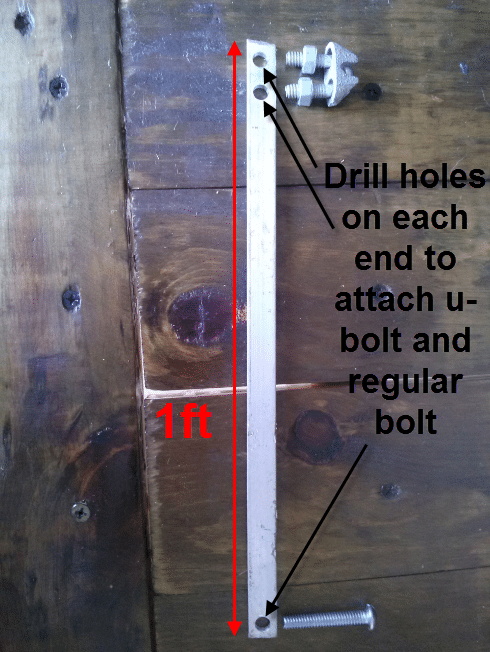
With your pliers (and vice if you have one) give the aluminum strap (7) a twist so that the holes on each end are facing perpendicular directions. Your aluminum crank is ready to attach

This is the bottom of your plywood. Drill a hole (with your hole saw if you have one) in the center of your plywood just large enough for the turning rotisserie spit to poke through.

This is the bottom of the rotisserie motor(8) showing the spinning spit that will stick through the hole that you just made in the plywood. Make sure the spit is cut to at least 3 inches long

This is the top of the plywood. The rotisserie motor is mounted on top of the hole facing down with it’s spit poking through the hole. It would be a good idea to attach the ropes for hanging the plywood platform now too.

This is how I mounted the rotisserie motor. Unscrew the top mounting plate from the motor

Face the bottom of board. Using the 1 1/4in wood screws, screw the rotisserie mounting plate into the plywood.

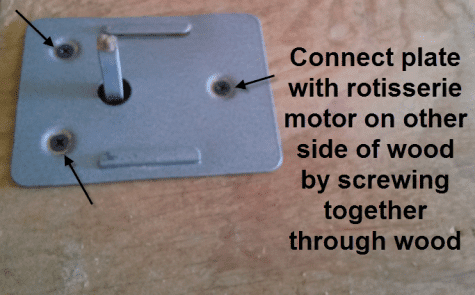
Line up the rotisserie motor against the other side of the plywood and connect the plate with the motor by screwing them together through the wood
Attach the aluminum crank to the end of the rotisserie spit that is sticking through the plywood using the eyebolt. Attach the nut (4) and bolt (3) to the end of the aluminum crank

This is how the bolt(3) and nut(4) at the end of the aluminum crank should look

Drill 3 holes into the washer (2)

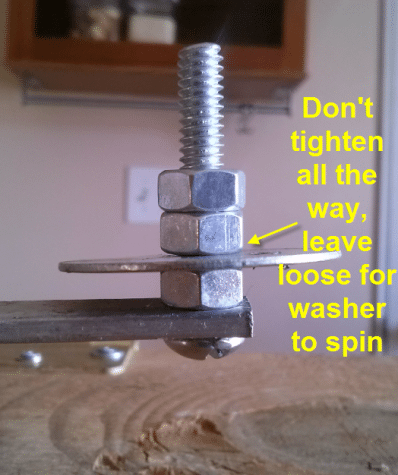
Sandwich the washer(2) in between the bolt(3) and the 3 nuts(4). Make sure the nuts around the washer are loose so that the washer can spin.
Using your hooks (6), hang the pulleys (5) where you want the head and arms to go on the wooden platform. You will have to decide if you will want eyebolts instead of pulleys and fishing line instead of black rope for the arms. Attach the head and arms of the puppet to the rope/fishing line, slide the ropes (or fishing line) through each pulley (or eyebolt), then bring the ends together to the spinning washer(2) and attach the ends to the washer
This is how the ropes that are attached to the head and arms will look when attached to the spinning washer. In this picture I used black ropes to hang both the head and arms, but later changed the arms to fishing line instead (If you are using fishing line to hang the arms, you can simply tie the line straight to the holes in the washer instead of using the wire)

Plug in your rotisserie motor and watch your spirit marionette rise up and down! You will have to eyeball the length and adjust the ropes/fishing line for the arms and head as they move, but this is the fun part!
David Wheeler
Thanks for this post! My son and I wanted to upgrade an old ghost we’ve used the past few years, and this was a perfect way to do so. Your step-by-step instructions and pictures made this easier to do. I’m impressed with the idea of using a simple rotisserie motor. It’s both quiet and spooky-slow.
Happy Halloween!
Tee
Hi David!
I’m glad you enjoyed my post! (Love your ghost by the way) Yes, the slow moving rotisserie motor is perfect for this effect. Happy Halloween right back at you!
Mac Daniel
hi, thanks for the illustration, i want to do this but have an angel instead of a ghost above my annual nativity manger. what is the best way to make an angel? tyvm, Mac
Tee
I’m sorry, but I don’t have any good ideas how to make an angel out of a ghost. It’s an interesting thought. Good luck with it! By the way, I love your creche! Did you make it?
Doug Ferguson
Hey, Tee! I’m the inventor of the FCG, Doug Ferguson. It’s lovely to see haunters like yourself keeping my 1982 idea alive! I’m still around on http://www.phantasmechanics.com and have video instructions there for my original industrial grade version of the effect, along with a how-to for my version of the marionette.
I also have a number of projection-map FCG’s you can download for free if you already use this technique.
Keep up the great work, and keep ’em flying!
Tee
Hi Doug!!!
OMG I’m so glad you dropped by!! You know, it was about 20 plus years ago that my brother and I built this awesome prop. It was the first animatronic we ever built for our home haunt and I’m telling ya, it’s STILL a hit today! I ended up having to repaint the puppet ghost a few years back because the paint was starting to fade from age…LOL. You are a genius for coming up with this idea, as I still see new haunters to this day that have their own FCG for their haunts. I’ll have to swing by your site to take a look at your videos and projection map FCG’s. My brother and mom will get a kick out of hearing that you dropped a line, as they are major Halloween fans as well!
Jennifer
I was wondering how weather resistant the ghost is? Can it get wet often? Can it get wet at all? It seems like the plywood would shield it a little bit, but we sometimes get the sideways rain in the fall. Should I make a small rain cap to put over the motor? I already have a few projects to add to my display for this year, but I’m thinking about making your ghost this year and then adding the movement to it next year.
Tee
Hi Jennifer!
If you can believe it, this project was made about 25 years ago and it’s STILL going strong (and just as popular)! It’s been rained on numerous times and the motor still works. I’m not sure how well they make these newer rotisserie motors, buy my old one is still ticking, LOL If you are still unsure, you could cover the motor with some plastic. The ghost has also held up well in the rain (yes, sideways rain). The blue paint did start to fade and a few years ago I ended up giving him a fresh spritz of paint which did the trick! If you end up making one you’ll have to share your pics!