
DIY Rock Mushrooms For the Garden
Everyone that comes over wants to take one of these little guys home, so I decided to make a tutorial for everyone so that we all can have one, or two…..or a dozen!
You can make big mushrooms, medium sized mushrooms or even little bitty mushrooms, depending on the size of rocks you pick out. The best place to look for rounded rocks like this are in riverbeds. They are smoothed and rounded out from years of being tossed and shaped by water running over them.
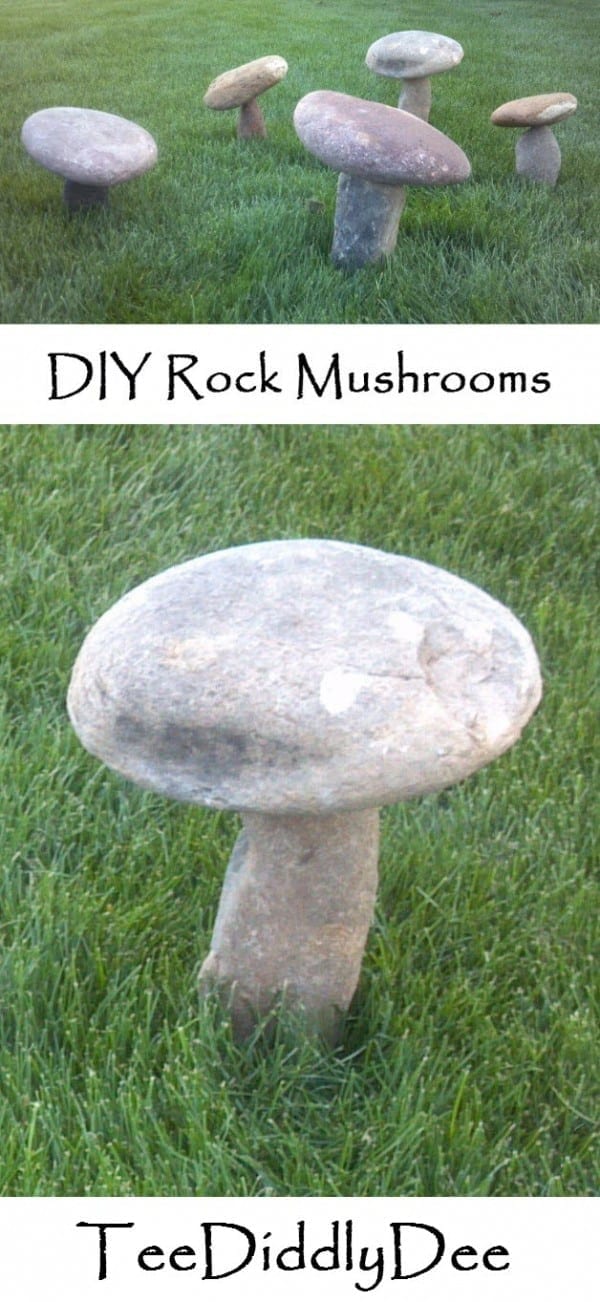
The mushrooms pictured in the pic below (except for the large one in the front), are about 6-9 inches tall using lighter, smaller rocks.
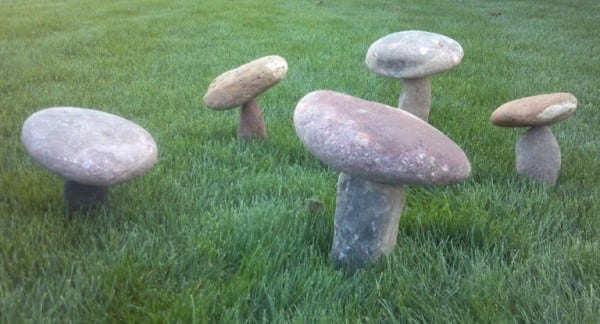
The larger mushrooms in the pic below (These are my original inspiration from my grandma’s cabin), range from 9 inches to about 1ft tall, (except for the smaller, reddish one).
Since I’ve figured out how to make rock mushrooms, I’ve actually made some as big as 1-1/2 feet tall using bigger, heavier rocks. I have found that anything over 1- 1/2 feet in height, starts getting too heavy for the ground to hold them up and they fall over easy. The heavier the mushroom, the harder your ground needs to be because of their weight…..but I will say, it sure does look cute with both large and small ones all clustered together! Follow along with my tutorial!!
DIY Rock Mushrooms For The Garden Tutorial
Supplies
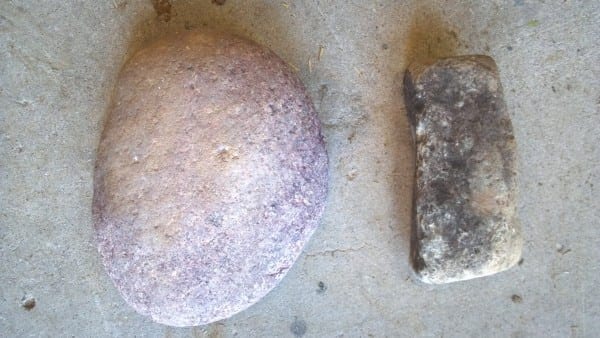
- (2) River rocks – one that is round and flat in shape for the top of the mushroom, and one that is rectangular in shape for the stem of the mushroom.
Smaller Mushroom:
- (1) 3/16in steel round rod – cut at 1 inch long (1/2 inch fits inside of the rock and 1/2 in sticks out)
- (1) 3/16in steel round rod – cut 8 inches long
Larger Mushroom:
- (1) 1/4in steel round rod – Cut at 1 inch long (You will need this larger size because of their extra weight).
- (1) 1/4in steel round rod – Cut at 1 ft long (for the very large mushrooms to support their extra weight when stuck into the ground)
Tools
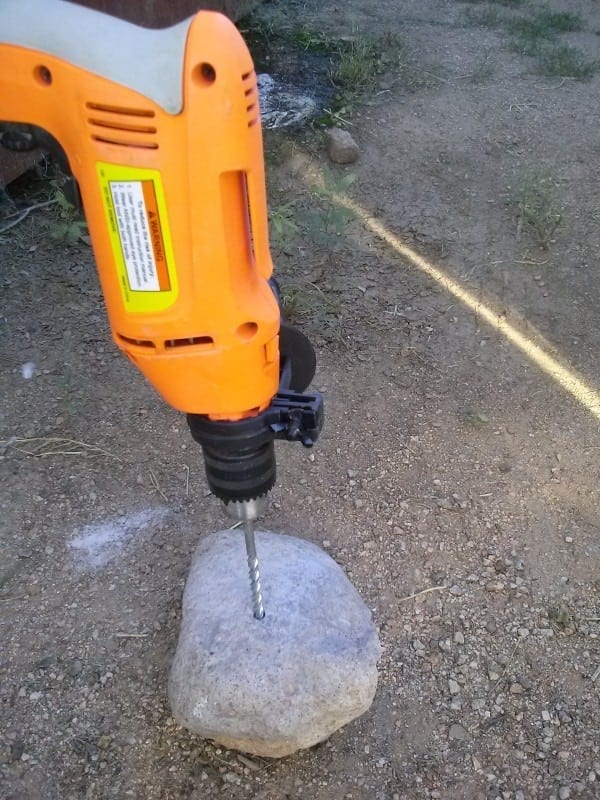
- Hammer Drill – Note: I’ve tried using both a drill press and regular drill and had very little luck–hammer drill is the way to go!
- Masonry Drill Bit – get same sized bits as your steel round rods. You will be sticking the rods into the holes you drill Note: Depending on how many mushrooms you make and how hard your rocks are, you may want to get 2 or 3 extra bits as one bit may wear out after making a couple mushrooms)
- hack saw (for cutting steel round rods)
Instructions:
Drilling the holes:
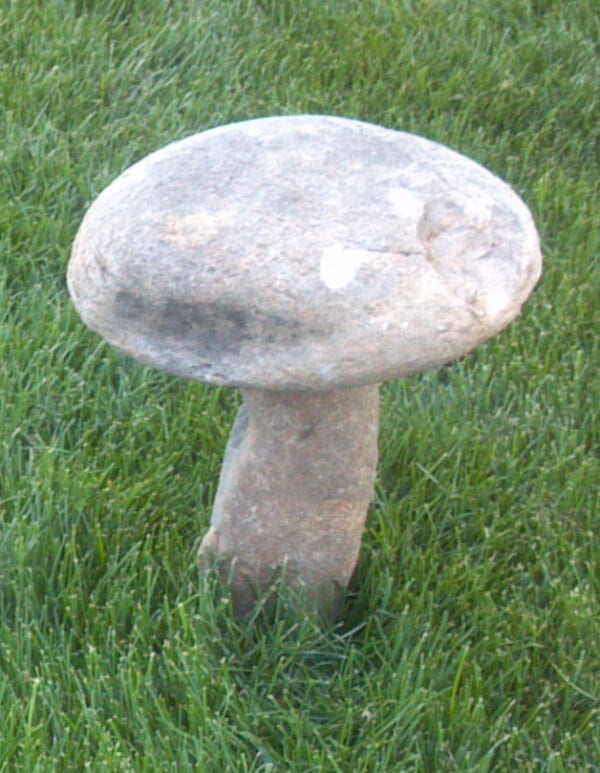
First, gather two rocks: one that is round and flat in shape for the top of the mushroom (left), and one that is rectangular in shape for the stem of the mushroom (right).
Next, using the hammer drill and masonry bit, drill a 1/2in hole into middle of both the top and bottom of the longer rock (stem of mushroom) and another hole into the bottom of the round flat rock (top of mushroom).
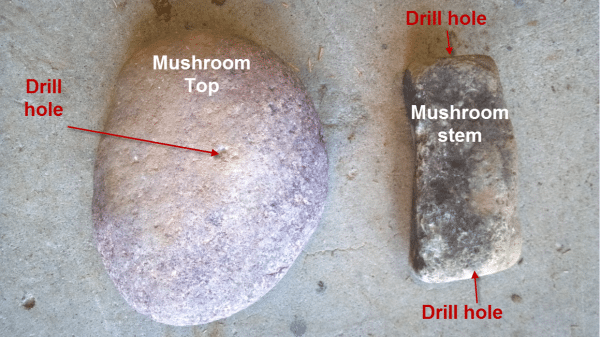
You can see me drilling a hole into the bottom of my top rock below.
Note: Be sure to wear your goggles and be careful if you have a helper hold your rocks steady (Make them wear gloves!)
Inserting the rods:
Insert the shorter rod into the top of the ‘stem’ rock (left) and the longer rod into the bottom end (right) as shown below.

Tilt the stem upright and push the longer rod into the ground. Then fit the top of the mushroom onto the smaller rod on top of the stem.
Important: If you are having trouble pushing the stem and long rod into the hard ground DO NOT pound any of the rocks with anything such as a hammer. Doing so will break the rocks! Instead, soak the ground with water to soften.
Now you are finished! Doesn’t they look awesome?
I would love to hear from you in the comments below!
DIY Rock Mushrooms For The Garden
Sharing at these great link parties:
Busy Monday. Inspire Me Tuesday. The Hearth & Soul. – Metamorphosis Monday. All About Home. All About Home. You’re the Star. Inspire Me Monday. Fabulous Party. Inspire Me Monday. Wonderful Wednesday. Beautifully Made. Creative Muster Party. Wow Me Wednesday. Your Whims Wednesday. Tuesday Turn About. Homestead Blog Hop. Tuesdays with a Twist. Farm Fresh Tuesdays. Wonderful Wednesday. Simple Homestead Blog Hop. Share Your Style. To Grandma’s House We Go. Vintage Charm Party.
More great link parties I’m sharing at:
Penny’s Passion Thursday. Party in Your PJs. Thursday Favorite Things. Grace at Home. Keep in Touch. Encouraging Hearts and Home. Funtastic Friday. Friday Favorites. Happy Pink Saturday. Dare to Share.- Saturday Sparks. Create, Bake, Grow & Gather.- A Morning Cup of Joe! Embrace Your Style. Happiness is Homemade. Snickerdoodle Create Bake Make. Over the Moon. Inspire Me Monday. Love Your Creativity.
tyler agent
Thanks for sharing, and that’s really cool of a little project to do. I’ve never seen something like that before, so I’m going to have to try it sometime.
Tee
Glad to hear you enjoyed this project Tyler! Now you’ll have to make a few of your own! 😉
Julie
I saw the mushrooms in the town next to ours and went looking for a tutorial, and found yours! Thank you Tee!
Tee
Awesome Julie! Glad you enjoyed my tutorial!
Phillip C Gardner
Hi Tiffany,
I saw some mushroom rocks recently at the Folsom (CA) Santuary and Zoo and have wondered how they are made. Your tutorial is quite helpful, but I have one (1) question: How do you secure (hold in place) the rocks while drilling the holes?
I suspect I could hold the top rock with my hand while drilling a small hole, but the stem rock is a different matter. Drilling a hole the length of the rock must take more than one’s hand. How do you do it?
Your feedback would be so helpful.
Stay safe,
Phillip
Tee
Hi Philip,
Good question! I actually had someone hold all of the ‘stem’ rocks steady while I did the drilling with my hammer drill. It really does make it easier with another pair of hands to help 🙂
Shirley G
I went to the Folsom mini Zoo. It was so inspiring, I was there for Hours! Took photos of tons of great shrooms. If you ever get near Folsom, definitely GO.
Tee
Are they real mushrooms or faux? Good to know! Thanks!
Tee
Hi Shirley, they are made of rocks.
Cecilia
Tiffany, these are fabulous! Thanks for sharing at Vintage Charm–pinned!
Dee | Grammy's Grid
Oh my, how unique! Thanks so much for linking up with me. Pinned!
Tee
Thank you, Dee! I’m glad you like them!
Sarita
What a fun project! Thanks for sharing at The Homestead Blog Hop! Looking forward to seeing what you have to share this week. 🙂
Tee
Thank you, Sarita, for your kind words!
Michele Michael
Thanks for sharing at Funtastic Friday. I adore these cuties. Can’t wait to make a few. Nice gift idea too.
Beverly
Tee,
Congratulations, you are being featured on Over The Moon party. I hope you stop by. https://www.eclecticredbarn.com/2021/04/over-moon-linky-party.html
Hugs,
Bev
Tee
Thank you so much, Beverly! I am so happy to be featured this week! 🙂